
|
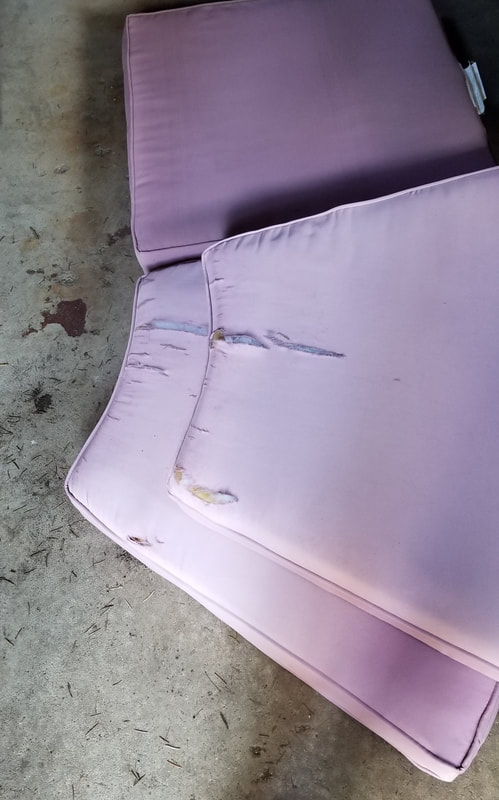
*** Fabric was gifted by Fabric Wholesale Direct in exchange for a blog post feature*** 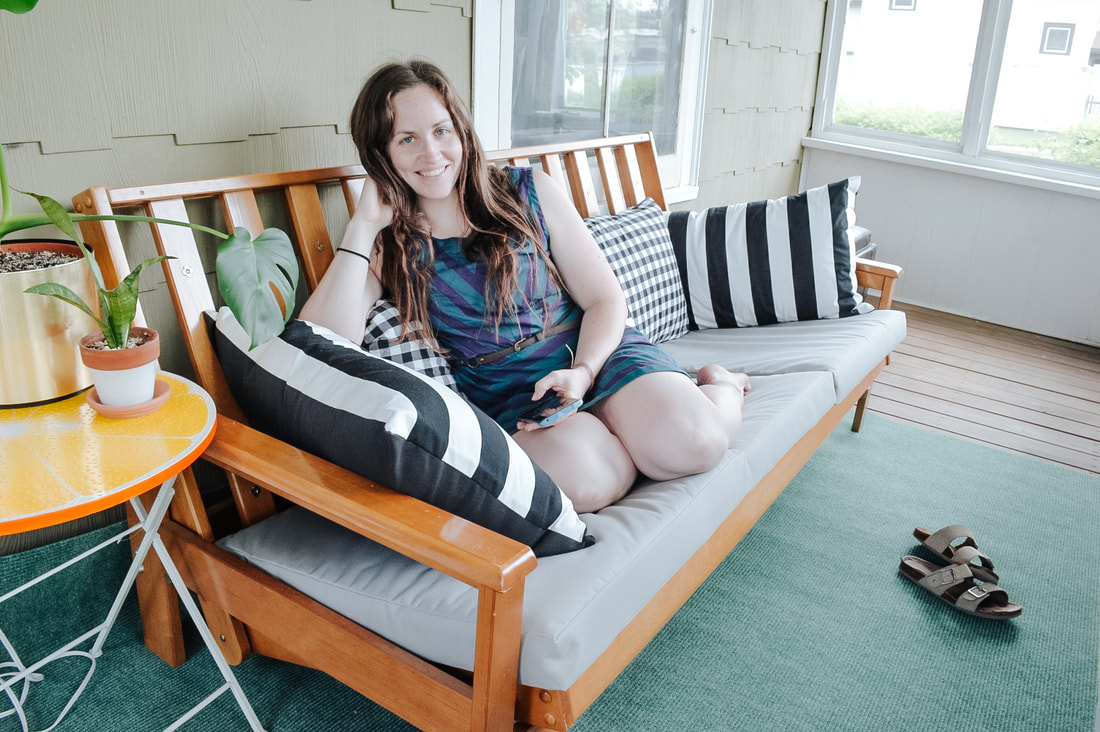 If you read my previous blog post Fabric Wholesale Direct Collab, then you know that I've been gifted several lengths of fabric from Fabric Wholesale Direct (FWD) in exchange for featuring these fabrics on my blog. And if you read that blog post carefully, you know that my first project was going to be recovering some outdoor cushions with the silver Ottertex Waterproof Canvas. And it's done!! 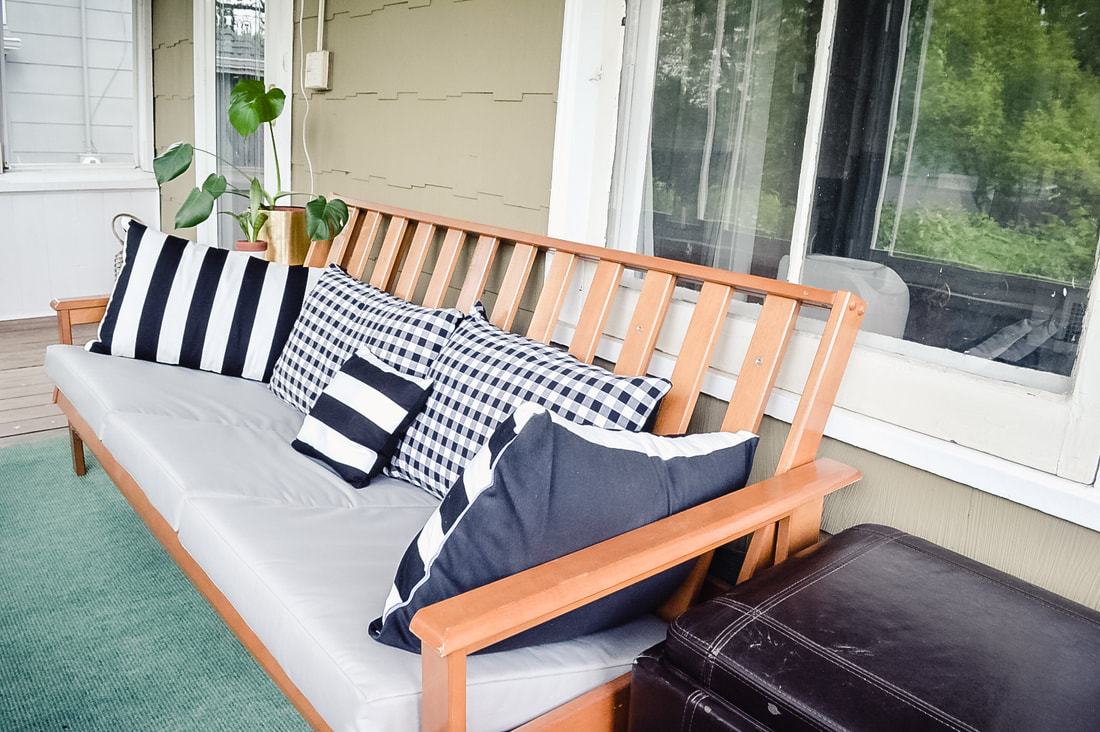 Let's start from the beginning: The house we are currently renting has a wonderful screened in front porch. And I knew instantly that I wanted some sort of a couch out there. I picked up a free cushionless futon off of Facebook Marketplace, as well as some free outdoor cushions that badly needed some love (also for free). I believe the cushions used to be brown at one point in time, but had badly faded in the sun to be a range of brownish pinks. At first I just tried dyeing the cushions grey with chalk paint, and tested them out on the futon. But as I tested them, I realized just how brittle the fabric had become along with the fading. So I decided they needed completely recovered. And right around the time that I realized that fact, Fabric Wholesale Direct reached out to me with a collaboration opportunity. I saw the waterproof canvas on their site and knew instantly that this was happening!
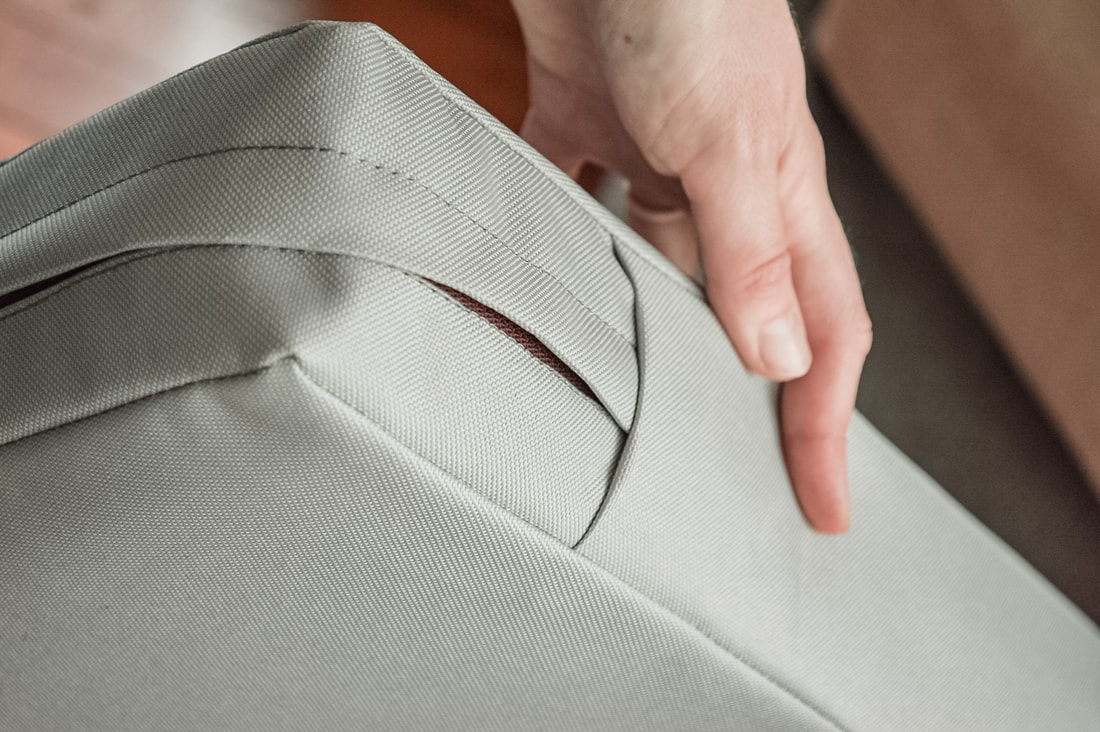
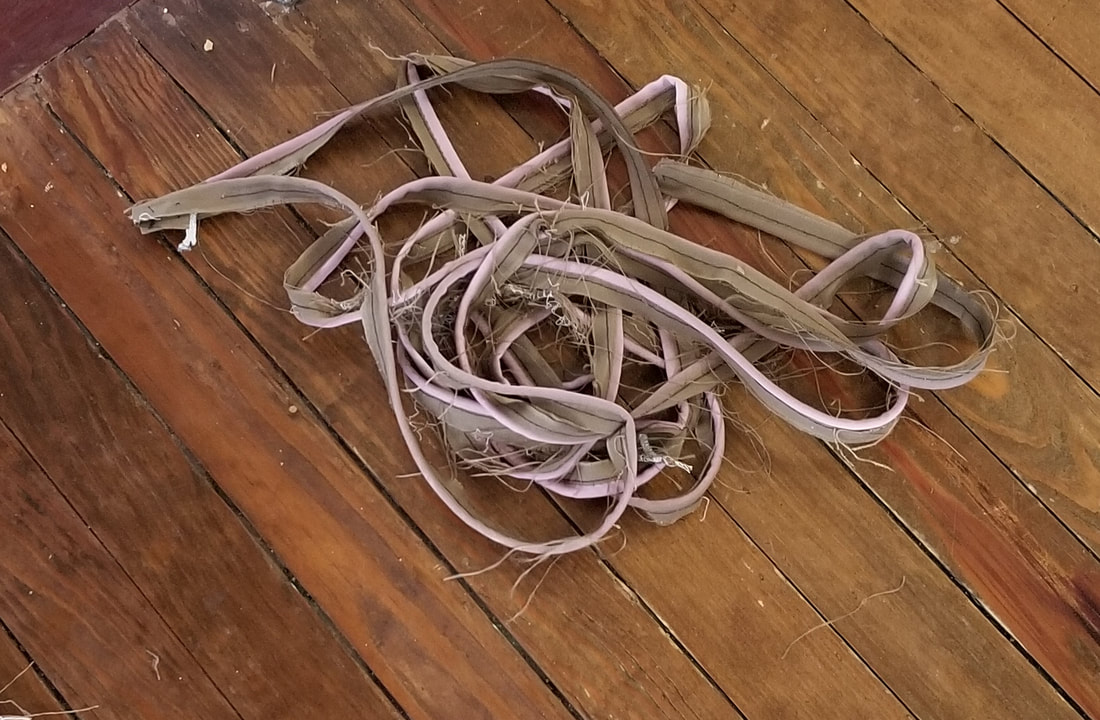
I ended up ordering 7 yards of the canvas, with plans to recover 6 cushions. Three would be for the futon on the porch, (with one middle cushion foam needing to be cut down about 6" narrower to fit the futon perfectly) and three more for our backyard couch (which I have tentative plans for building myself...). To keep things as cost effective as possible, my original plan was to reuse all the original zippers and piping for the new cushions. But, I ended up using neither. As you can see in the photo above, the original cushion design had the zippers going across just the back side of each cushion, and not even all the way across. This makes it much more difficult to squeeze the cushions in and out. I decided to use my own zipper tape in order to make it long enough to wrap around the corners, making it much much easier. As for the piping, I found that the majority of the cord inside the original piping had actually disintegrated, so it was not an option. But it was a huge disgusting mess in my living room. So I briefly considered getting some more cord to replace the original, but ended up deciding that I don't particularly want it on my outdoor cushions anyway. While I love the look of neatly piped edges, it was really just going to be a place for water and dirt to collect in the crevices.
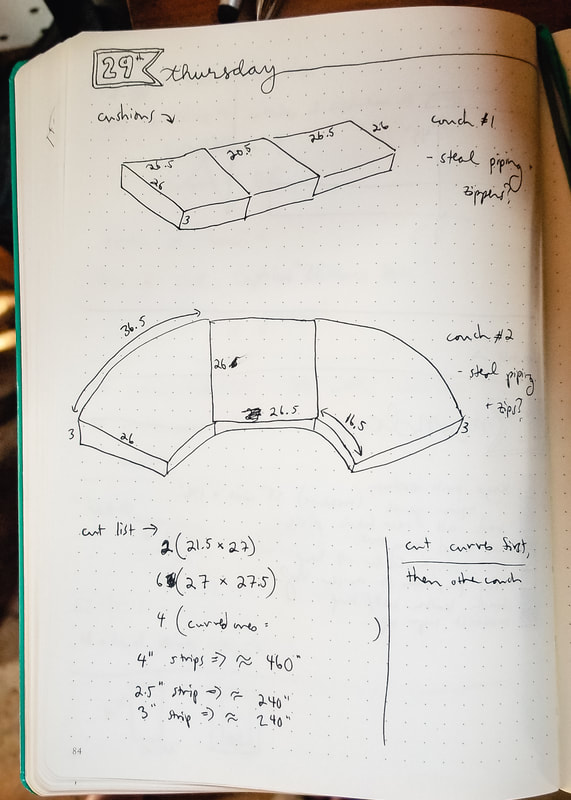
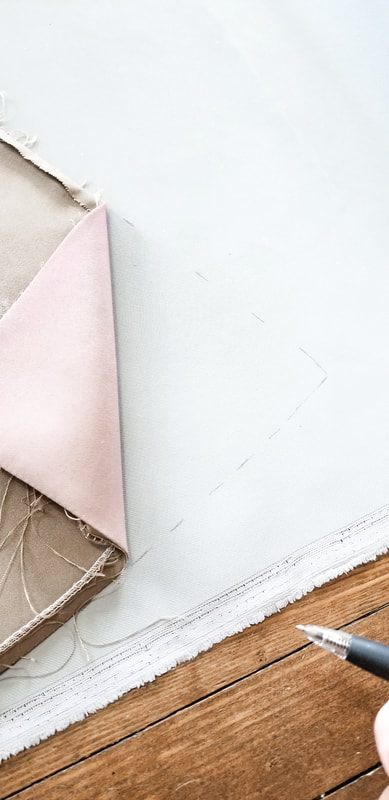
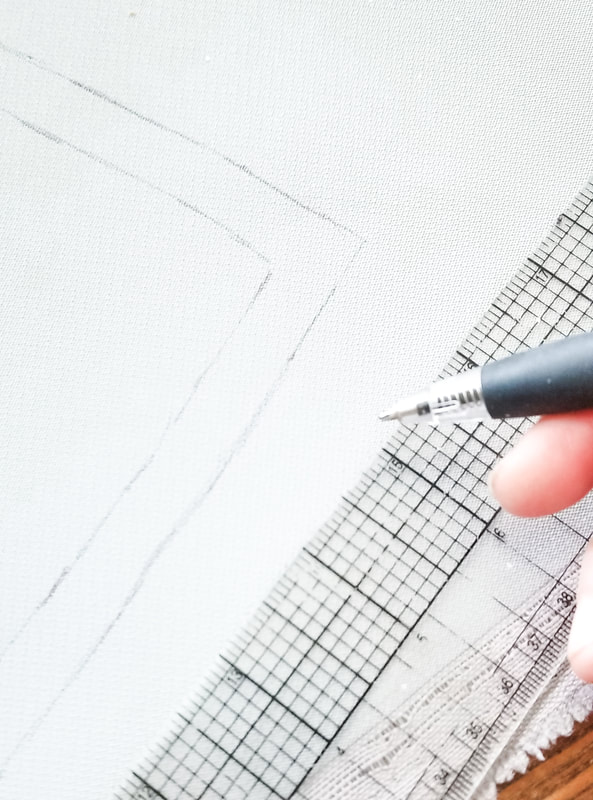
I measured my rectangle cushions, and decided to add 1/2" seam allowance, and wrote out how many cuts of what sizes I needed. For the curved cushions I used the original fabric as a template. I chose one without rips, and unpicked the stitches. I traced around the fabric, using the SEAMLINE as my tracing point, since the seam allowance was completely frayed and uneven. I added my own 1/2" seam allowance to the traced line instead. I drew all of this directly onto the back side of my fabric, and then proceeded to use this first cut fabric piece as a template to cut out the other 3 curved cushions.
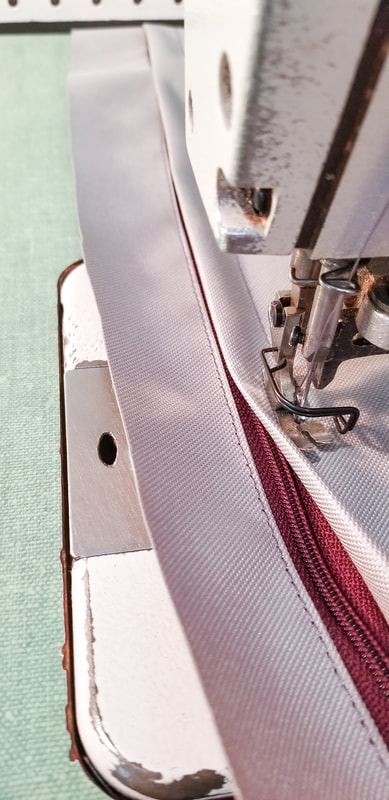
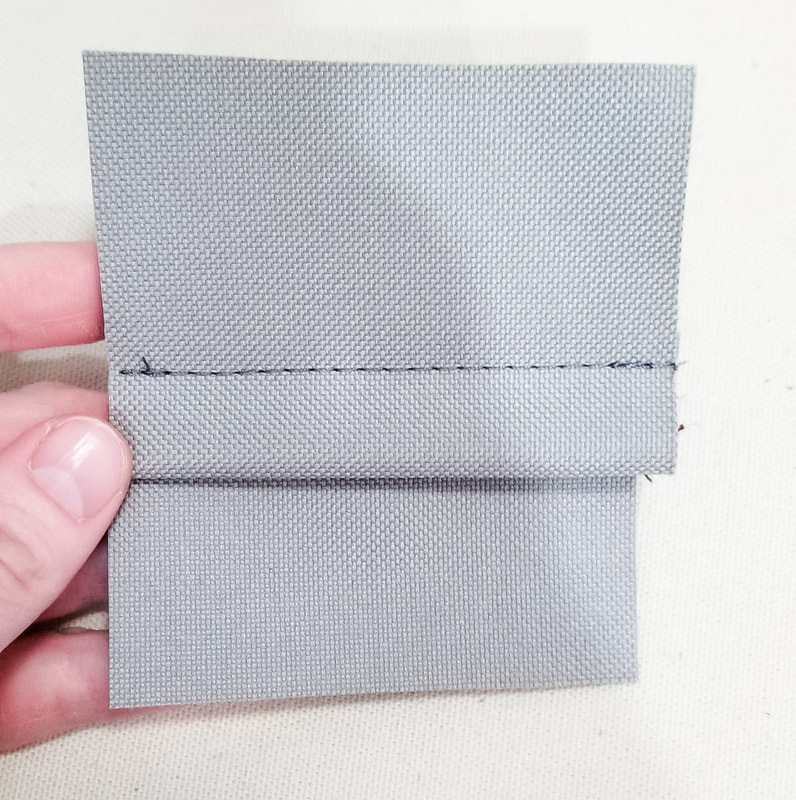
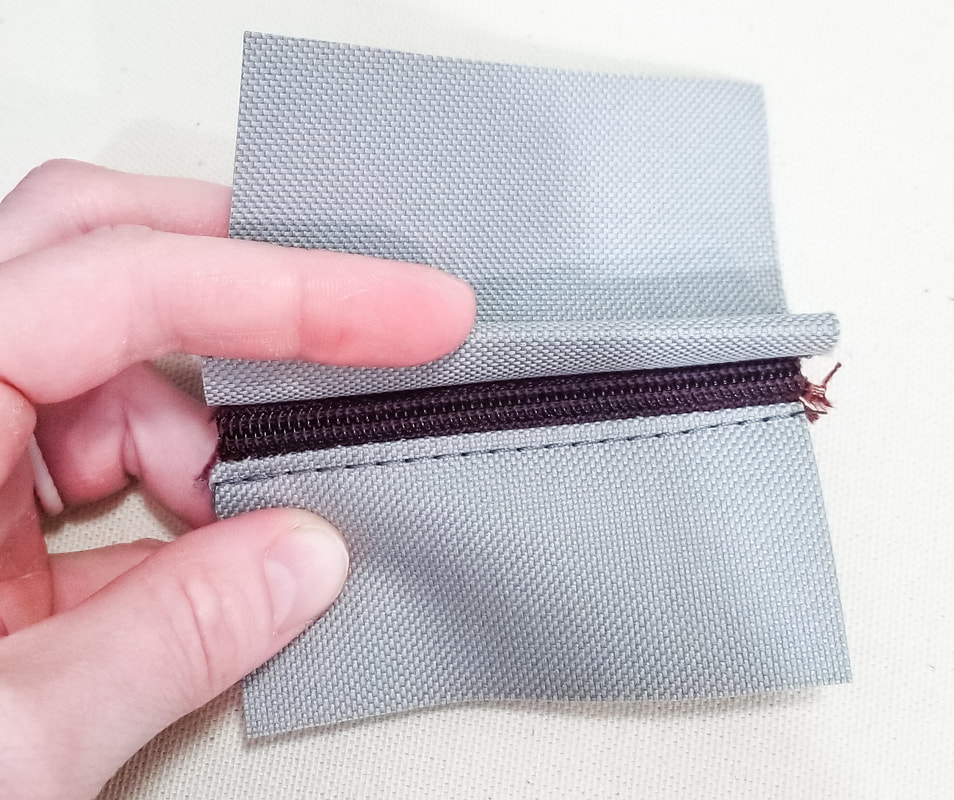
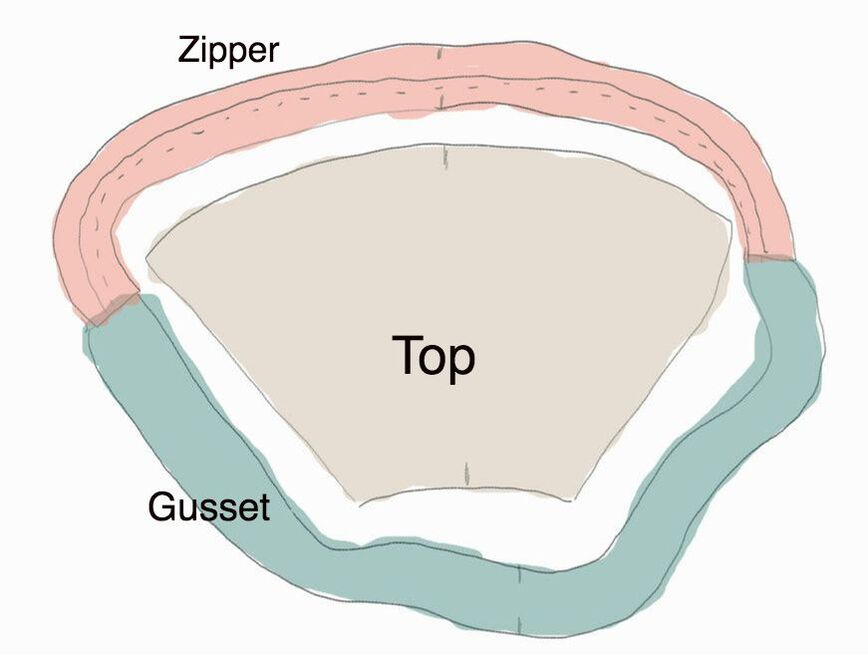
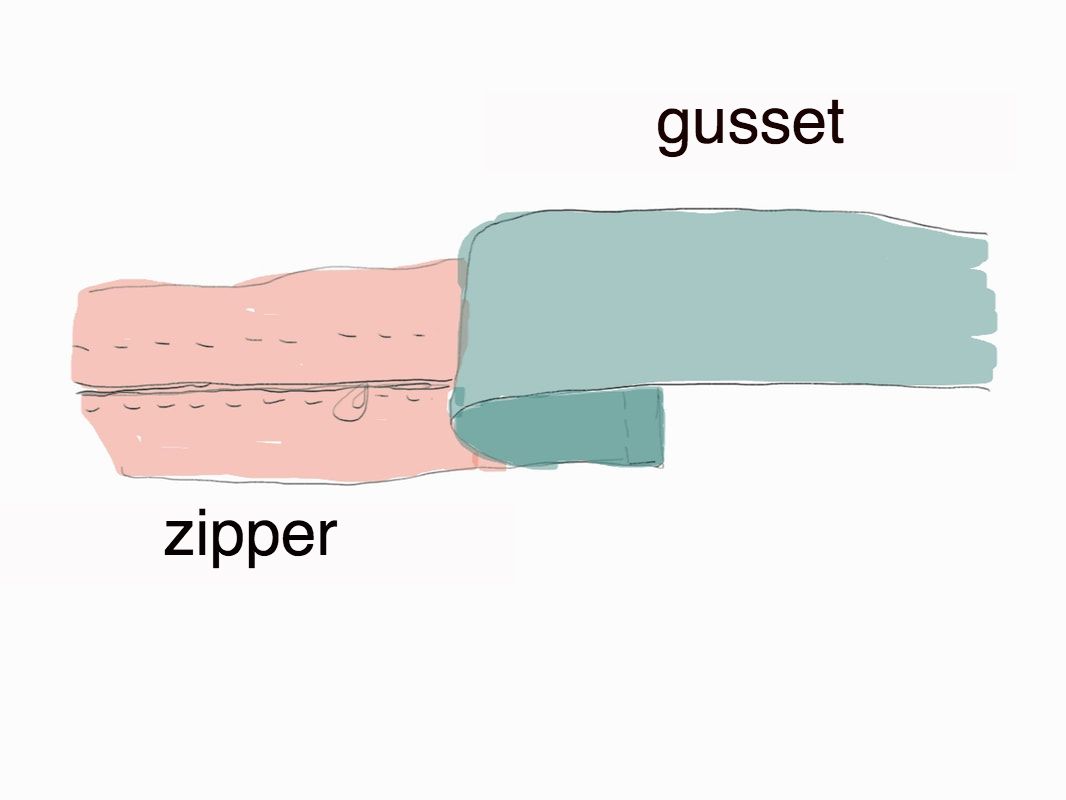
After cutting out all the tops and bottoms of my cushions, I had to cut out the gussets. I decided to create a lapped zipper cover to keep rain out of the cushions, and also a lapped end of zipper area to make construction easy and for added rain protection as well. To start, I created a mock up of my lapped zipper, to make sure that my 2" and 3.5" strips were the correct size to get to the 4" width I needed to match the rest of the cushion. Then, I decided that each side of the zipper would wrap 5" around the edge. And I would give myself 2" of extra lap on each side of the gusset. Here's the breakdown for one of the curved cushions: The 36.5" back side of the curved cushion plus 5" for one side, plus 5" for the other, plus 1" for the seam allowances = 47.5" zipper cut length. Also needed: 47.5"x2" and 47.5"x3.5" cut from the fabric for the zipper flap. The front of the gusset is 16.5", plus 26", plus 26" for both sides, the 10" of zipper subtracted and the 4" lap ease on each side added, and then add another 1" for the total seam allowance = 63.5" Which makes one cut of 63.5"x4" for the gusset.
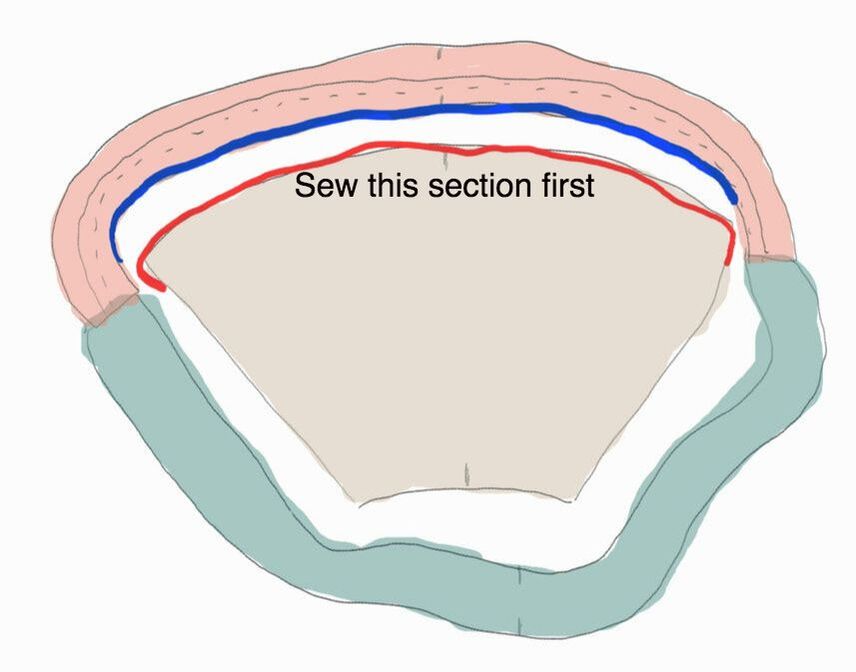
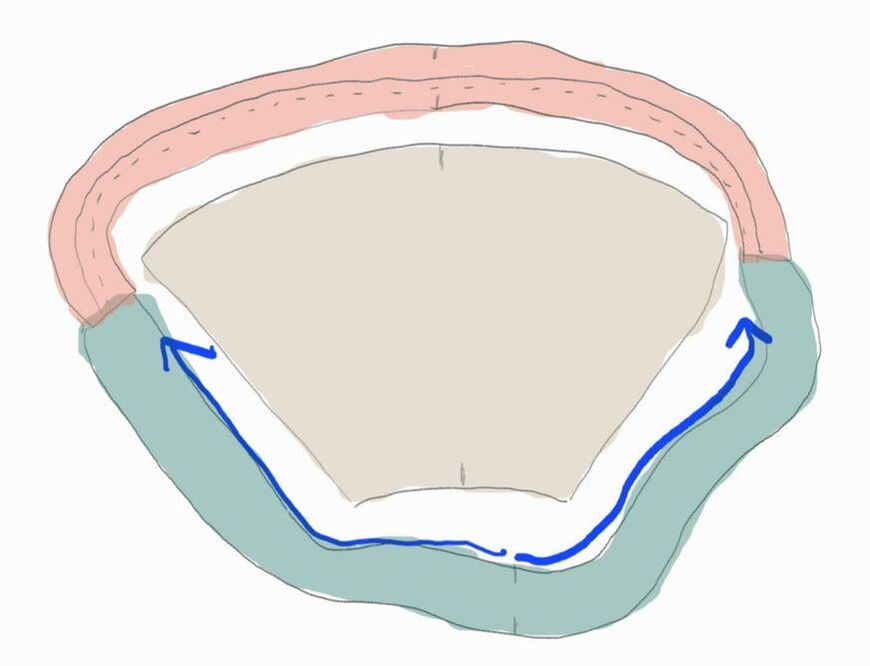
Tips for sewing box cushions:If your machine has aggressive feed dogs that like to gather as you sew, (your cushions are wonky and corners don't line up) these tips are especially helpful. 1. Mark the middle of the zipper tape and the back edges of the pillow and always start sewing at this spot. Sew from the middle to the corner, on both sides. Mark the middle of the gusset and the front as well, and do the same. 2. When you come to a corner, make a mark on the gusset 1/2" up and in from the corner. Mark this on BOTH sides of the gusset. This will help you line up the other side of your cushion. Clip into the gusset to (but not through) that point. Sew right up to the point and pivot with the needle down. The clip with allow you to easily turn the gusset around the corner. 3. Sew the zipper side in first (starting in the middle and sewing first one side then the other), until you get past the corner by an inch or two. Then stop. 4. Then sew the gusset side (starting in the middle and sewing first one side and then the other), sewing all the way to where you stopped sewing the zipper. When you get close to the end, there will be extra fabric from the gusset. Simply fold it flat as you sew, so that the extra fabric laps over the zipper section. 5. Always keep the same piece against the feed dogs for the entire cushion. For example, I always sew with the gusset on top, even if it means having to awkwardly stuff the bulk of the cushion into the harp. And when I sew in the second side of the pillow, I still sew with the gusset on top. It makes a HUGE difference in being able to line the corners up nicely. 6. Don't forget to unzip the zipper before sewing on the bottom of the cushion. Otherwise you won't be able to flip it inside out. This all seems way more confusing written out than it is to explain in person, so I drew up a few quick sketches to help illustrate some of my points. They may or may not be any less confusing. But basically, if you have any questions I'm happy to clarify!
 The Ottertex waterproof canvas worked out perfectly for this project. It's great for outdoor projects because it's waterproof (duh) and durable. The edges don't fray, which means no serging necessary. I love the neutral color I went with, but there are also a TON of other fun colors to choose from. And I was worried that the fabric would have too much of a sheen for my taste, but I am pleasantly surprised by its lack of shine (if that makes any sense). 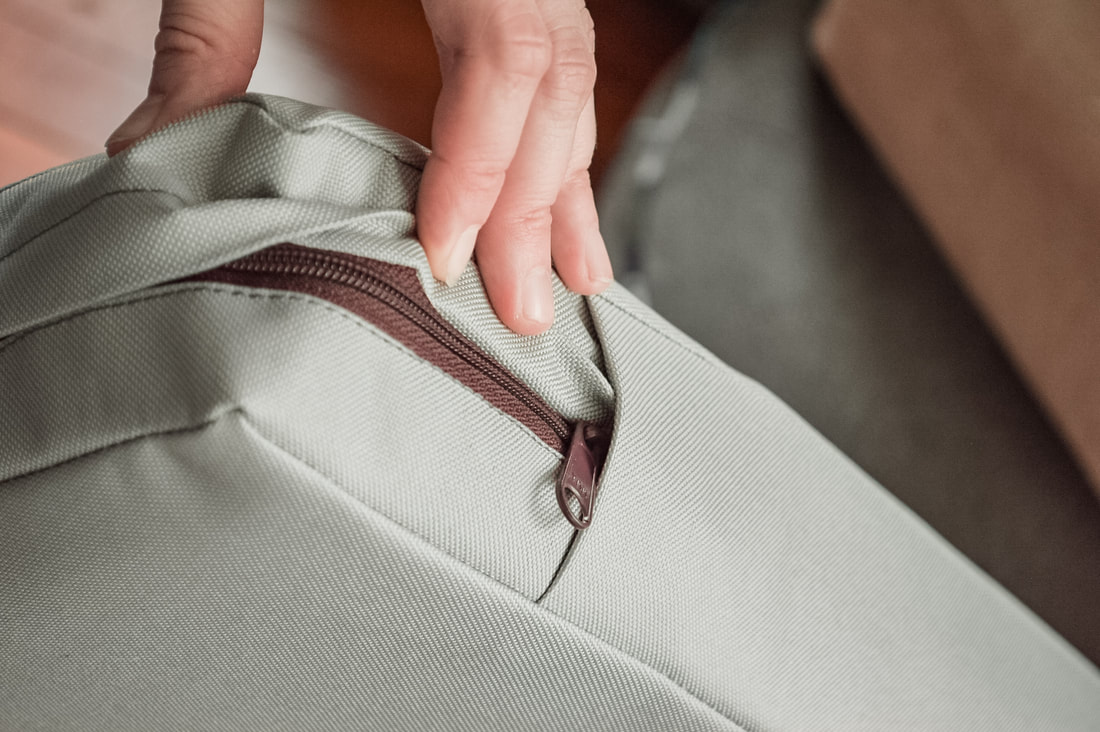 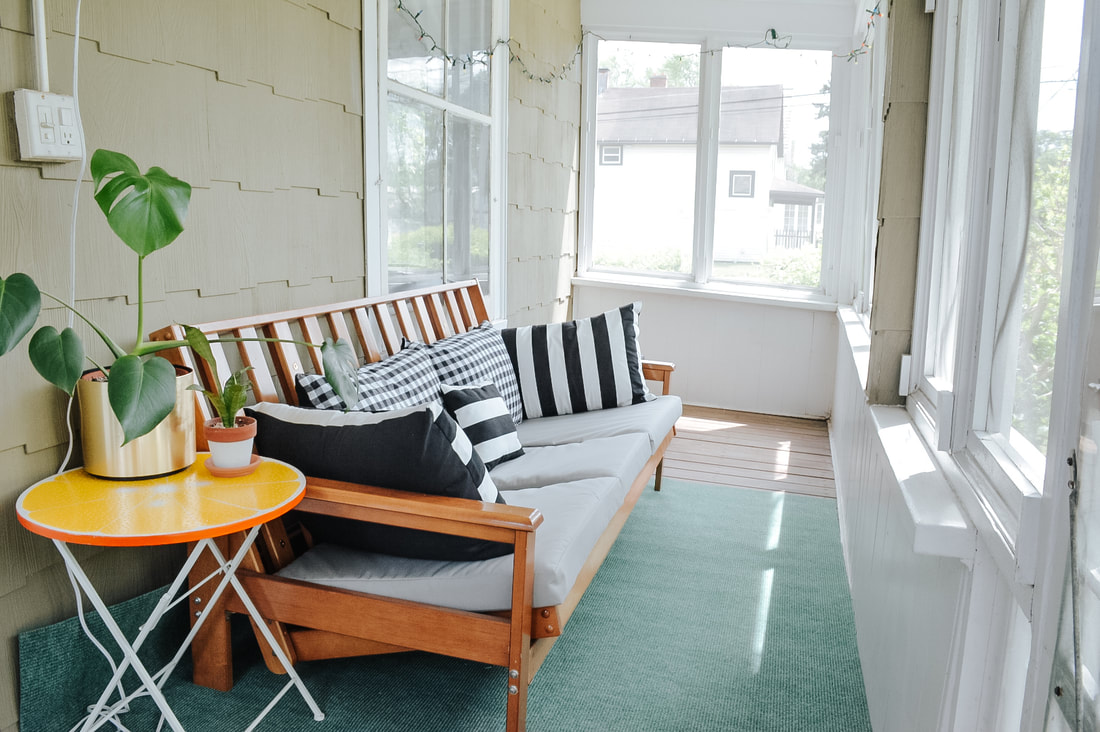 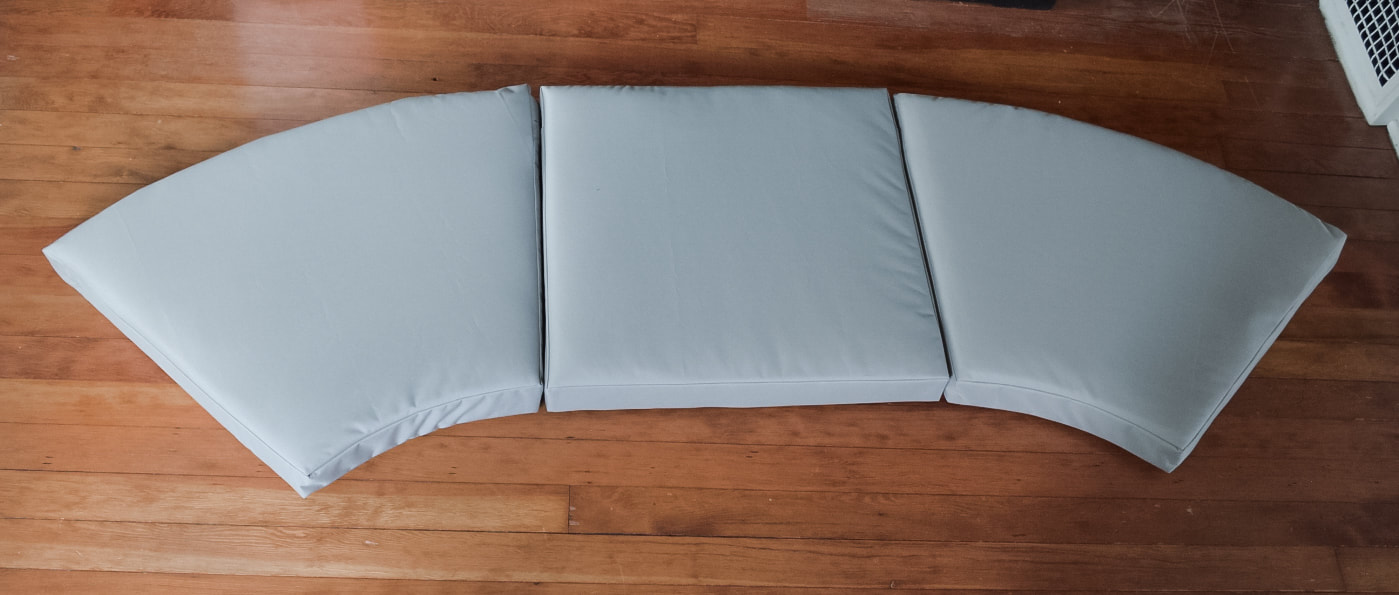 I'm excited to try my hand at creating a simple outdoor couch for these extra cushions. But in the meantime, I will be enjoying my newly updated front porch. Did I mention it even has a ceiling fan? It is heavenly.
2 Comments
All the chapters for the writing are produced for all people. The suggestions for the are aligned for the forms. The theme is ensured for the use of the techniques of the approval of the pitons for all individuals. Leave a Reply. |
madeline stage
creative business owner. designer. hoosier. crafter. runner. sewer. swing dancer. outdoor enthusiast. entrepreneur. wife. mom. material hoarder. Categories
All
Archives
June 2023
My Instagram Feed:
@GoheenDesigns |

 RSS Feed