
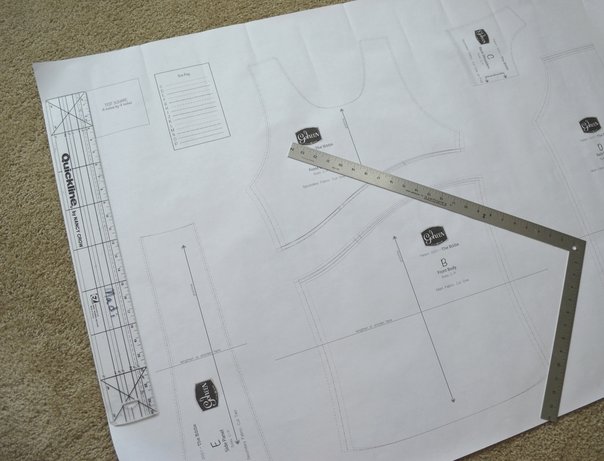
 This blog post may be coming a little late, but my excitement about releasing a garment pattern is so fresh that I figured it’s still relevant! The process of creating and releasing a sewing pattern, especially one that requires grading and testing, is a lengthy one. I started patterning my first rendition of The Eddie Tank in January, and didn’t release the finished pattern until May. Obviously, I wasn’t working non-stop on this project all those months. I was also working my day job, fulfilling Etsy orders, working on the wholesale side of my business, and also doing all the back end administrative work as well. Finding (or creating) time to work on the patterning side of my business isn’t always easy. Which is why I’m so excited to finally have the fruits of my labor ready for the picking!
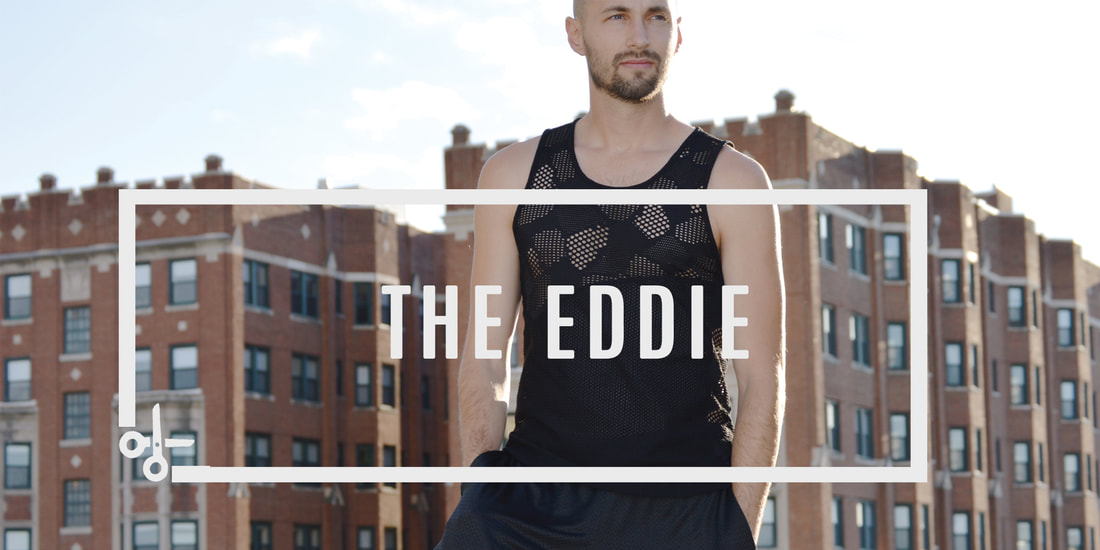
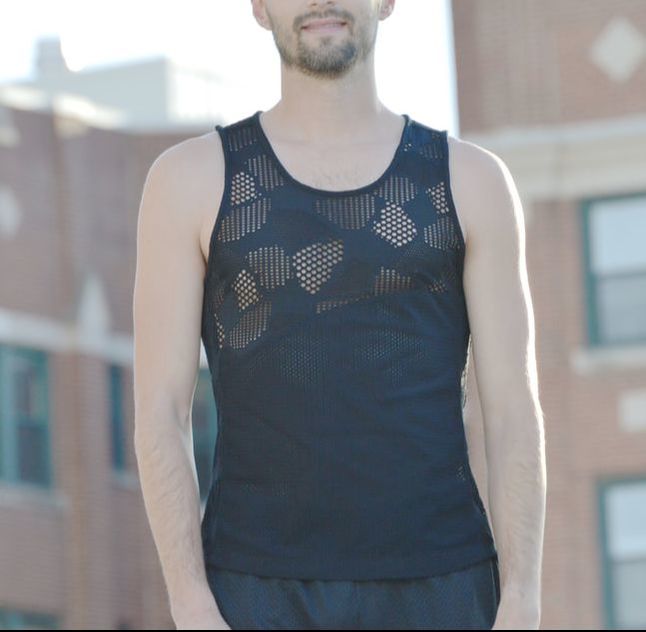
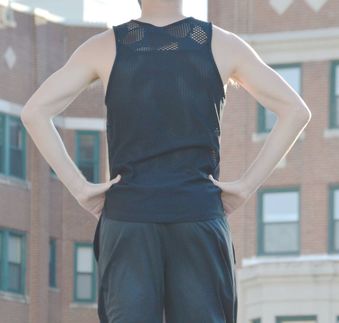
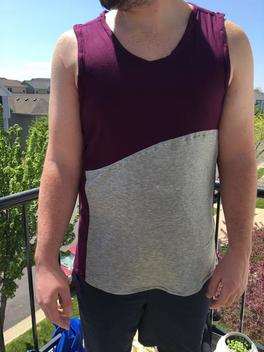
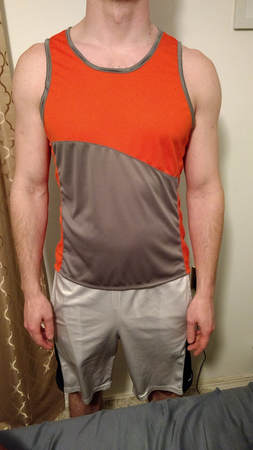
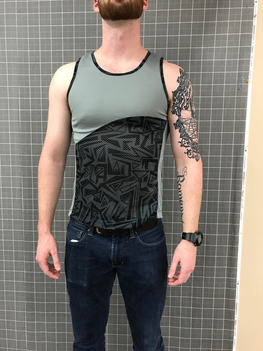
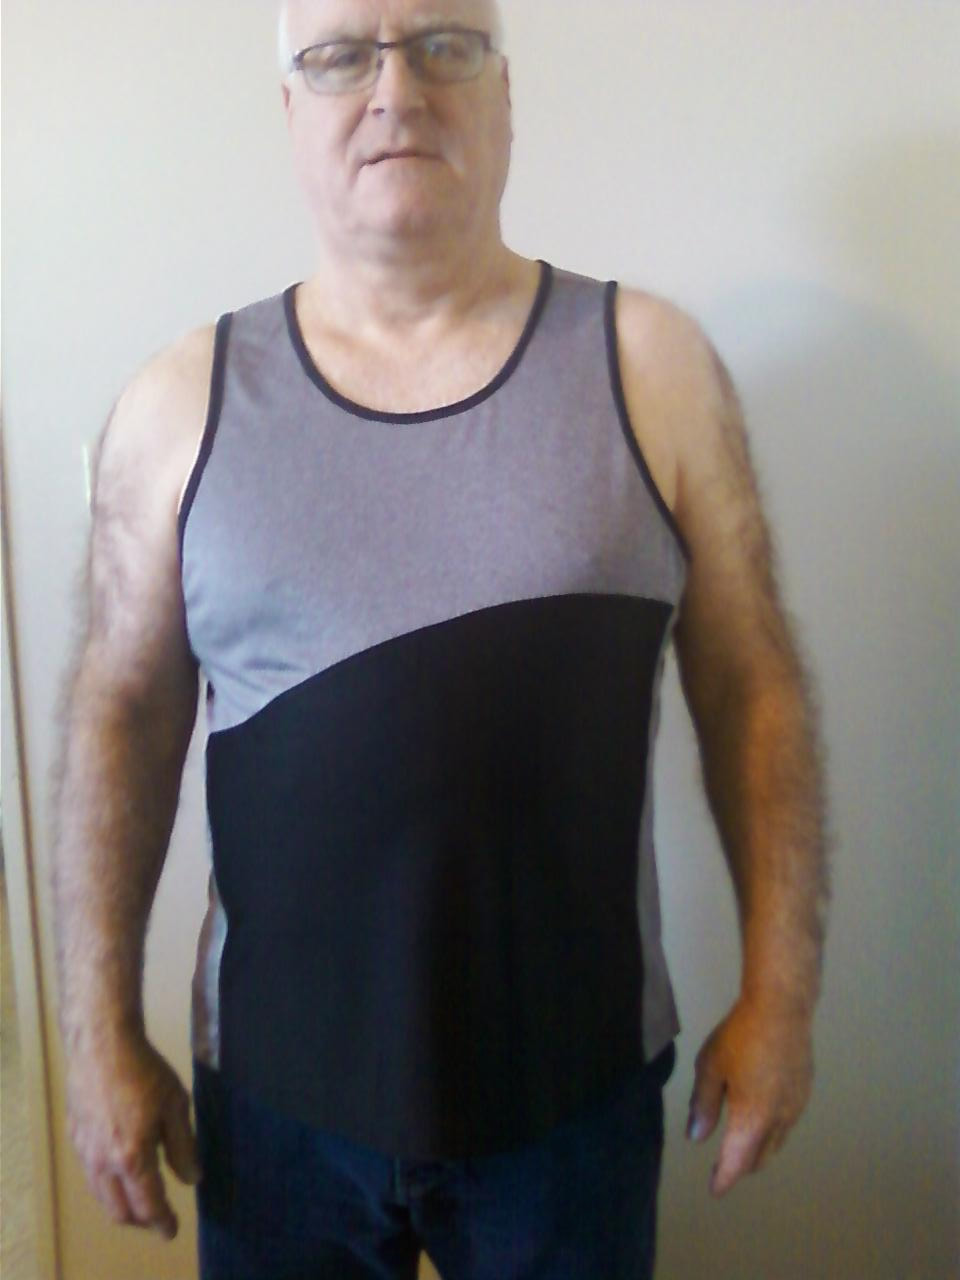
 The Eddie was inspired back in January by…. You guessed it…. Eddie! For those of you who don’t know him, Eddie is my husband, and his signature look in life is a running singlet. Years of running every day, often multiple times a day, means that running tank tops are one of the staples of his closet, and an easy pick even for when he’s lounging around in the Indiana summer heat. Inspired by this, I wanted to create a simple, comfortable, and stylish workout tank that is a quick sew. 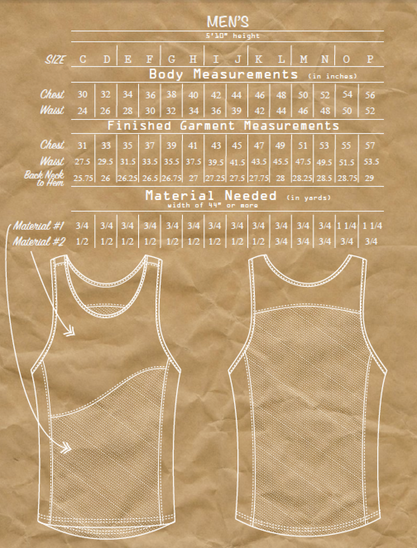 For my household, this garment is one that we can make over and over, and wear over and over. Exercise is a very high priority to us, and we aim to work out in some form every day, and Eddie's usual form is running. And when you run every day, you can go through 7 of these puppies in a week. And that is only if we manage to do laundry every week (we don’t). So quick to sew was a must. Stylish is the other side of the coin. The swoosh in the front is just enough to add some interest to the tank, a way to make it stylish, and a way for you to individualize your singlet by incorporating different fabrics into the same tank. The bound arm and neck holes also allow for a contrasting fabric, and give the top a very clean, professional look. Also, the side panels not only add to the style of the top, but also allow for use of a mesh fabric to keep super cool and comfortable when you are working out. 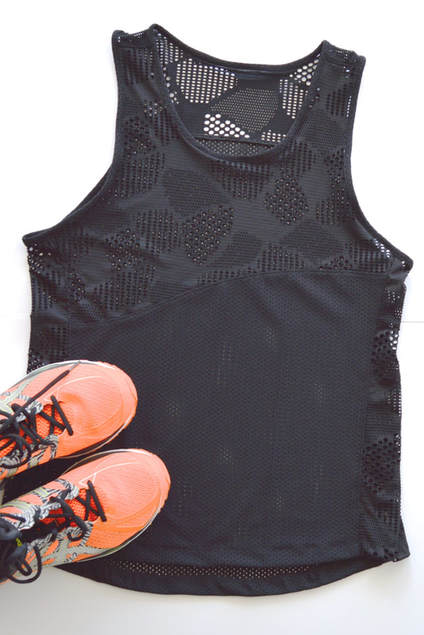 For this sample of the Eddie tank, I used performance honeycomb mesh on the top and sides and regular performance mesh for the main back and front pieces. I found these at my local Joann’s (I was surprised too!) and they have been great to work with. Along with all the photos I took of Eddie in the Eddie (he is such a trooper) I wanted to share some of my testers’ photos too! They did a great job, and I love seeing the different color combinations they came up with.
Basically, I love my Eddies, both human and fabric, and I can’t wait to see even more of them pop up as more people try out one of their own.
0 Comments
 PDF sewing patterns can be so convenient! You have such a wide selection of patterns to choose from, and of course downloading the pattern leads to near instant gratification. That, and the fact that PDF patterns are usually less expensive, make them a fantastic sewing resource. But, they do come with an extra step, which can be a hassle. Printing, cutting, and taping together a sewing pattern can deter some people from even wanting to use PDF patterns in the first place. This is where large format printing comes in handy. In some of my patterns (like the clothing ones) you will find that I've given you two ways to print your new pattern. The first is labeled "Tiled Pages" and the second is "Wide Format" The "Tiled Pages" version is just what it sounds like. The pattern has been broken down into 7.5" x 10" sections that can be printed on letter or A4 paper, from your home printer if you want. The "Wide Format" version has the pattern laid out on one large page, which can be printed on a wide format printer at a copy shop (or I suppose at home, if you are lucky enough to have one). This version will be no larger than 32" wide (to accommodate different types of wide format printers) and however long it needs to be to fit the whole pattern. If you open up the PDF and hover your mouse over the left-hand corner, the measurement of the PDF will appear, so that you can get an estimate of how expensive it will be to print. Pro Tip: no matter which version you use, I've created layers in the PDF, so that you can minimize ink usage, and minimize any confusion from all the different sizes. When I printed The Eddie, I wanted only the lines for sizes F, G, and H. I was making a size G, but I wanted to print one size above and below, in case of future changes in body measurements, or in case I wanted size references for altering the pattern. Turing on and off layers is super simple to do! And don't let copy shops tell you that you can't do it! I've been told by a few different shops that turning off the layers isn't possible, but once I showed them how, it worked just fine! Here is how: open up the file in Adobe Acrobat. On the left-hand side, you will see a panel with 5 little symbols running down the side. Click on the fourth one down, the one that looks the photo below (two square thingies hovering, one translucent one above the other). Then you will see the list of all the layers, each with a little eye next to it. Click the eye to turn off the layer, so that it won't print. Voila! 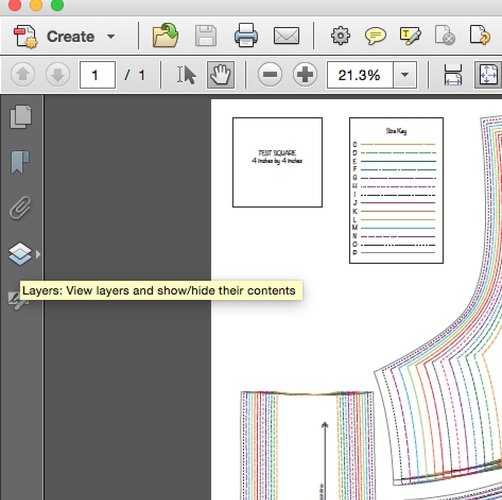 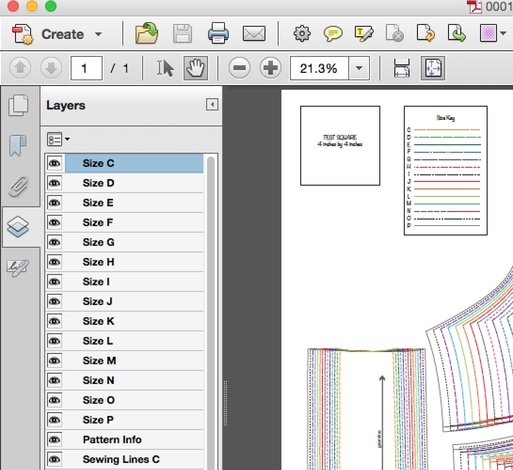 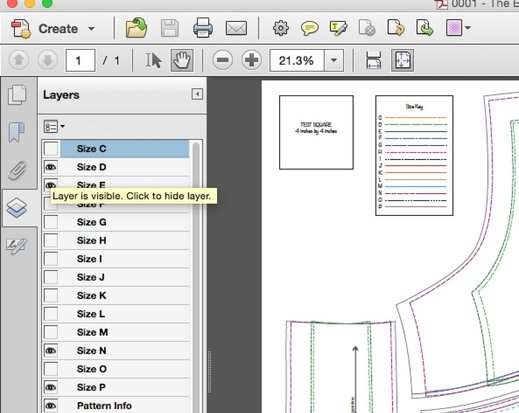 Some options for places that have wide format printers: (sometimes your large pattern prints will be categorized as blueprints, fyi) FedEx (Kinkos) UPS Office Depot Office Max Staples College Campus Copy Shops Local Copy Shops  This giant machine is what I ended up printing my pattern on at FedEx with the help of an employee. It costs $.75 per square foot. How to Print: 1. Save the pattern onto a thumb-drive and take it to one of the shops listed above. Or upload it to the copy shop website if you don't have a thumb-drive. 2. Take it to one of the employees behind the counter. Ask for an estimate of how much it will cost. For real. Different shops have different printers, that print different qualities. When I took The Eddie to get printed, the prices ranged from $6 to $47 at different shops. Always check the price! 3. Tell the employee that you want to print a. in black and white or in color, whichever you want b. printed to scale. NOT resized or shrunk in any way c. on the cheapest, thinnest paper they have d. certain layers. If you want to turn off layers, now is the time. You may have to show the employee how to do it. I've been told a few times that it isn't possible, only to find out that the employee didn't realize they could! 4. Check the print when it comes out, and measure the test square to be sure that the sizing printed correctly. 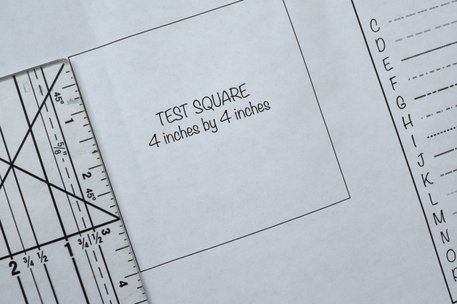 Getting my pattern printed took less than 5 mins, and $8. It was extremely convenient (and made me want a oversized printer of my own). It is an added cost, but depending on the size of the pattern (aka how many pages you would have to print out anyway and tape together) in question, it may be worth it. Especially if I'm in a rush!
As I move my company more towards sewing patterns and kits, and as I work on my first ever clothing pattern for sale (!!) I've had to develop a series of sizing charts to help you pick out which pattern size will fit you! I've thought a lot about this, especially about how confusing and emotional clothing sizes can be. When I shop for a dress, I can come away with anything from a size 6 to a size 12, depending on the brand I'm trying on! Every company has developed their own way to size clothing, and some have even started "Vanity-Sizing" their clothing. This means that these brands have begun shifting their sizing to make shoppers feel skinnier. For example, someone like Twiggy, who was a size 8 in 1962, would now be considered a size 00 in some brands. And really, as a marketing campaign, it's not that surprising that companies would do this. As women, we especially tend to hold a lot of stock in our size, and are more likely to buy clothing with smaller sizes because it makes us feel more confident. So what does this mean for the Goheen sizing system? It means that I've decided to do away with these numerical size labels. Instead of seeing that you are a size 00 or a size 16, my sizes are simply letters of the alphabet. I'm hoping that this little change will help in a few ways. First, it will hopefully get rid of any self-conscious feelings associated with a number that, let's be honest, doesn't even have a real meaning anymore! Second, it will make sure that you look carefully at the measurements instead of the size. Instead of someone being sure that they are a size 8, they now have to take their measurements and compare which set will work best for them for a particular pattern. And since I've gotten rid of the sizing numbers, I figured why keep the small - medium - large setup? So I've dropped that too! Now, I offer animal sizes! If you ever have any questions about my sizing, you can head on over to our Facebook Pattern community for help :) The animals are: Unicorn, Octopus, Dinosaur, Bunny, Hedgehog, Penguin, Tortoise, and Fox! My next task is to make sure that we are all on the same page as far as how to take your measurements for these charts. Stay tuned for the next blog post! Women's size chart in inches: 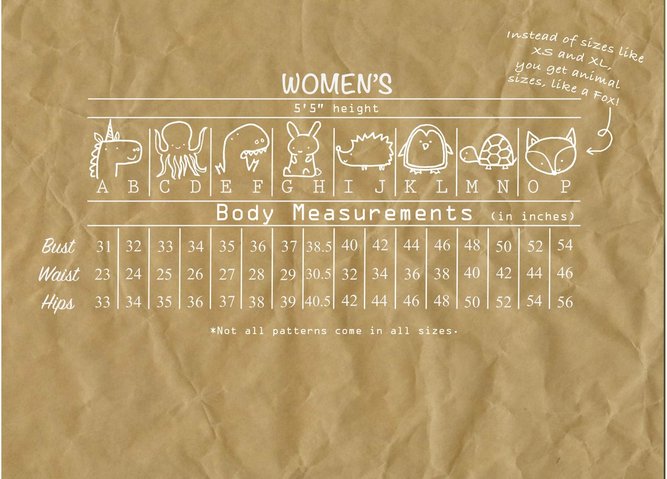 Men's size chart in inches: 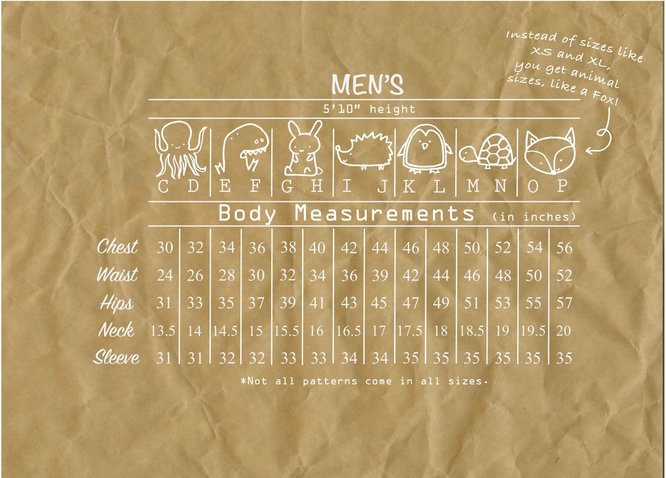 Women's size chart in centimeters: 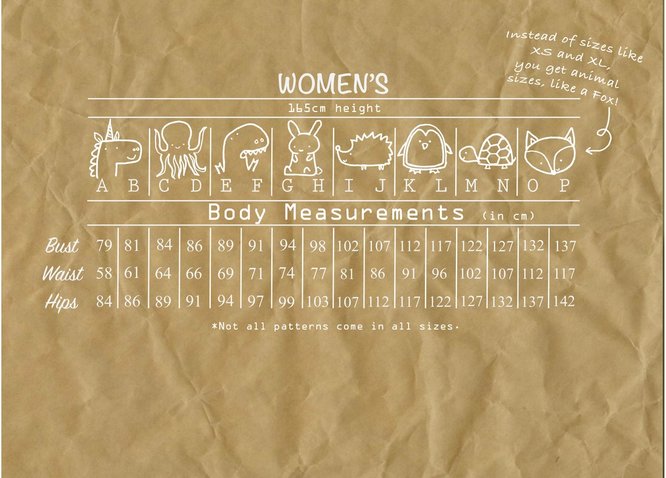 Men's size chart in centimeters: 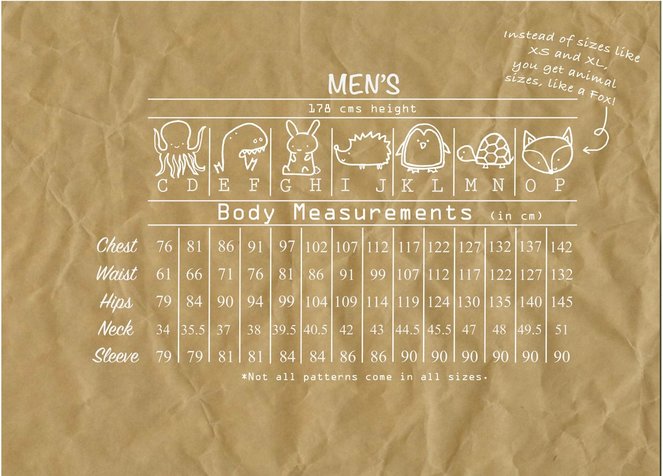  I have a new downloadable pattern for you! Just in time for Halloween, you will be able to make yourself a Blood Pool Pillow! This pattern is super easy, and a perfect DIY for when you are in the mood for a quick Halloween project. You can get the pattern on my website, on Etsy, or on Craftsy. Once you get the pattern, you can come on back here for a helpful photo tutorial:  When you print your pattern, make sure that you click the option that says "Actual Size" so that it will print correctly. 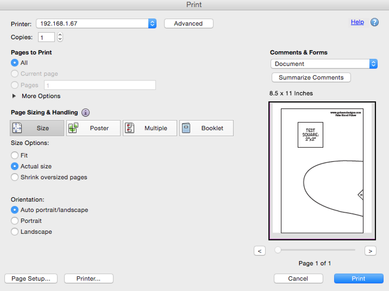 Print just the first page, and use a ruler to make sure that the Test Square does indeed measure 2"x2" 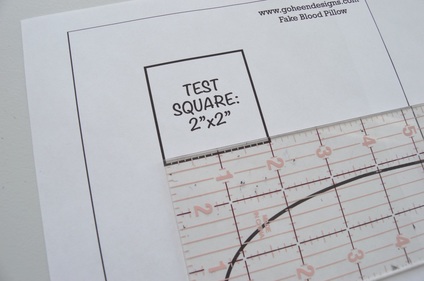 Print the rest of your pages, at "actual size" and lay them out, matching the diamonds on the edges. (A1 to A1) It should look like the layout below. 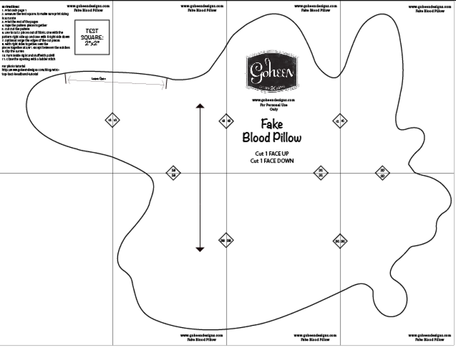 Cut the right edges off the printed pages along the rectangle line. 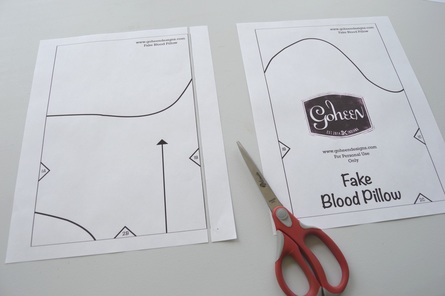 Now match up the lines and diamonds and tape the pages together. Do the same for connecting the top row to the bottom row of pages, to create your whole pattern! 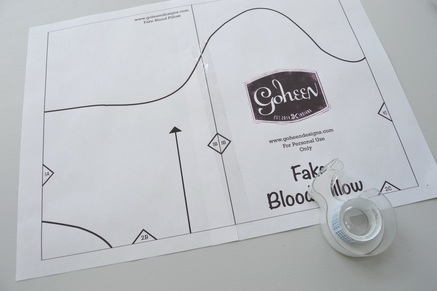 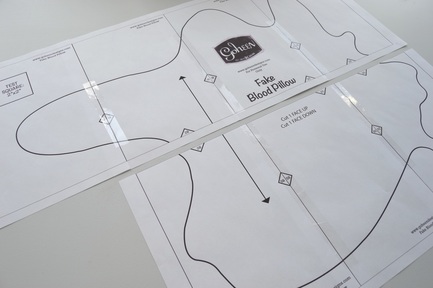 Now cut out your pattern along the solid black line, and you are ready to go! 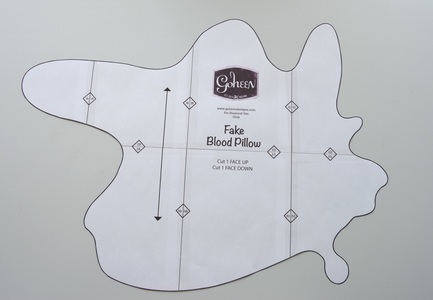 To start your pillow, you first have to cut out your fabric. Cut two of your pattern pieces, making sure that one is face up, and one is face down. 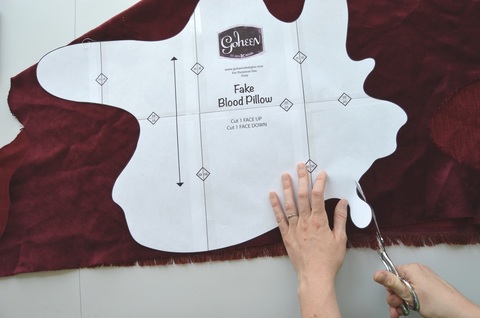 If you have a fabric that is likely to fray, serging the edges is always an option at this point. 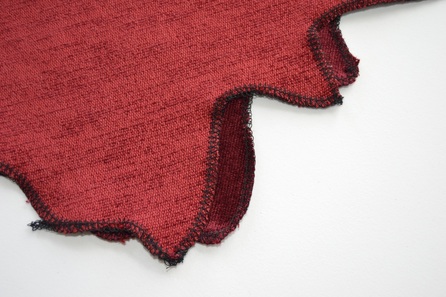 Now machine stitch around your pillow using 3/8" seam allowance (or just inside your serging) all the way around except for the area between the notches that says "Leave Open". Make sure to reinforce where you stopped and started with a little backstitching. 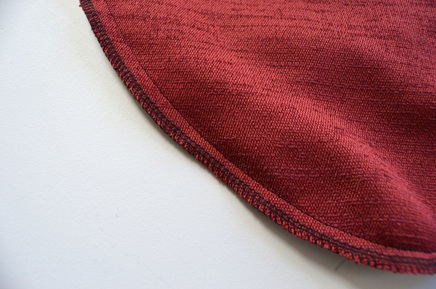 Clip the curves, turn the pillow inside right, and stuff the pillow as much or as little as you like! 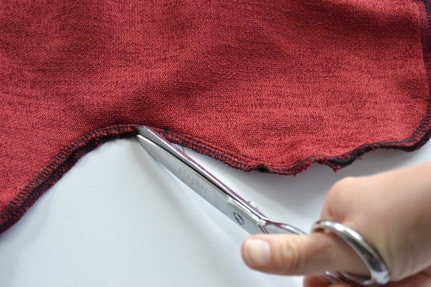 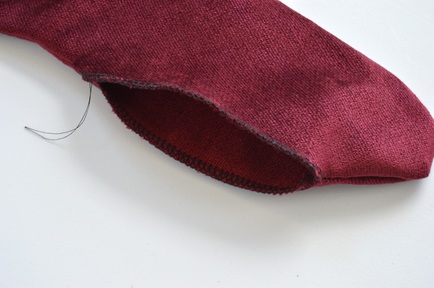 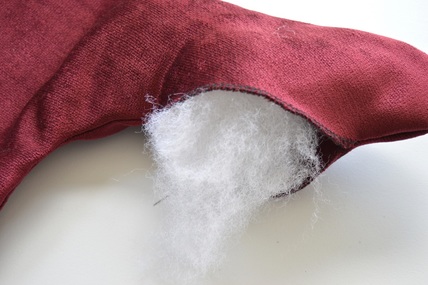 Close up the opening in the pillow using a ladder stitch. If you need a refresher, take a look at my ladder stitch tutorial post. 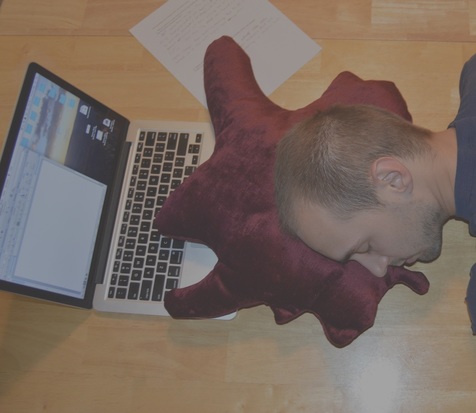 Enjoy your pillow, and Happy Halloween!
 Have you ever looked at the patterns I sell, and thought "Can I do that?" Well, this post is for you! The more patterns that I come out with, the more I started thinking about creating levels of difficulty so that I can label my patterns correctly. I've created a list of levels, and descriptions for each level, so that you can know which patterns you can handle, and which ones you might need help with! Here they are: 1. Curious 2. Capable 3. Confident 4. Cocky 5. Couture 6. Crazy Bonus: Custom 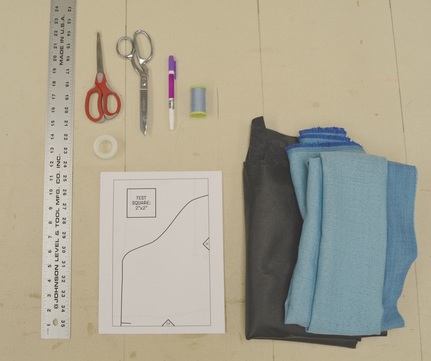 Now let's break them down a little:
Curious: Beginner. I would love to sew! I have a sewing machine, but I've really never done anything with it. Capable: Advanced Beginner. I've sewn a couple times, and I've used a few sewing patterns. I sometimes have to refer to my sewing machine manual to figure out how to change things. Confident: Intermediate. I sew on the regular and I'm very familiar with using sewing patterns. I know my machine like the back of my hand! Cocky: Advanced. I am a fantastic sewer! I don't even need to look at directions most of the time. I just look at the pattern pieces and intuitively understand how things go together. I have lots of different sewing machines. Couture: Very Advanced. I know some advanced sewing techniques, and I don't mind taking extra time to make my projects really stand out. I can draft my own patterns but I'd rather you do the pattern work for me so that I can get sewing. I can handle any alterations I may need to make. CRAZY: Crazy. I LOVE SEWING NO MATTER HOW HARD OR WEIRD IT IS!! GIVE ME EVERYTHING YOU'VE GOT! COMPLEX SEWING PROBLEMS? PUZZLES? BRING IT ON! (I don't actually know yet what kind of pattern would be in this level, but I thought I needed to go there, just in case) Bonus - Custom: This isn't really a level, but it is a good label to know. When you see that I have marked a pattern as custom, you will know that for an extra fee I can alter the pattern just for you! For example, my Quilted Tombstone Pillow is custom, because you can customize the text on the tombstone!
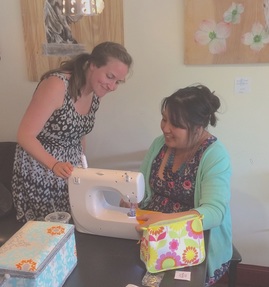
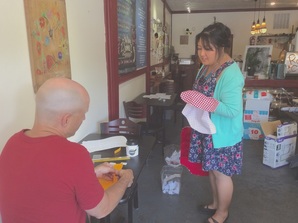
I’ve made patterns before. And I’ve taught sewing classes before. But this past weekend was the first time that I’ve combined the two. After teaching my last class at the Indy Trade School (if you haven’t heard of them, it is definitely worth checking out!) about how to use downloadable patterns, one of my students suggested that I teach how to actually sew one of my Indiana Pillow patterns next. I thought this class would be more nerve wracking to teach (I am a terrible public speaker) but it was actually so much better! I should have just started with a sewing class instead of the presentation on patterns, which I thought would be easier! Sometimes my tiptoeing nature ends up making things harder on myself. Teaching sewing is much less formal than a presentation, and I felt so much more relaxed this time. Although that may also be because I had some awesome students!
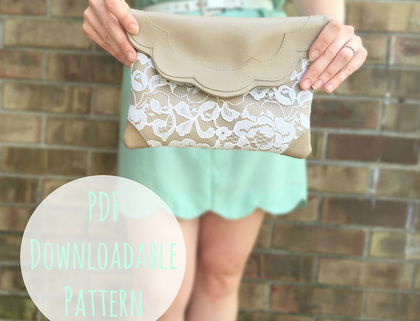
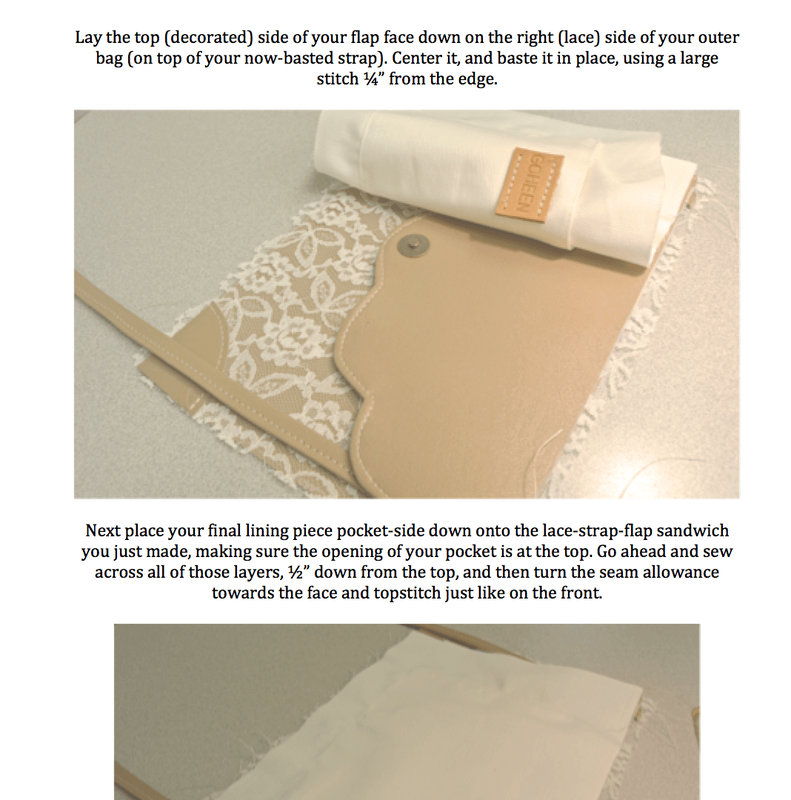
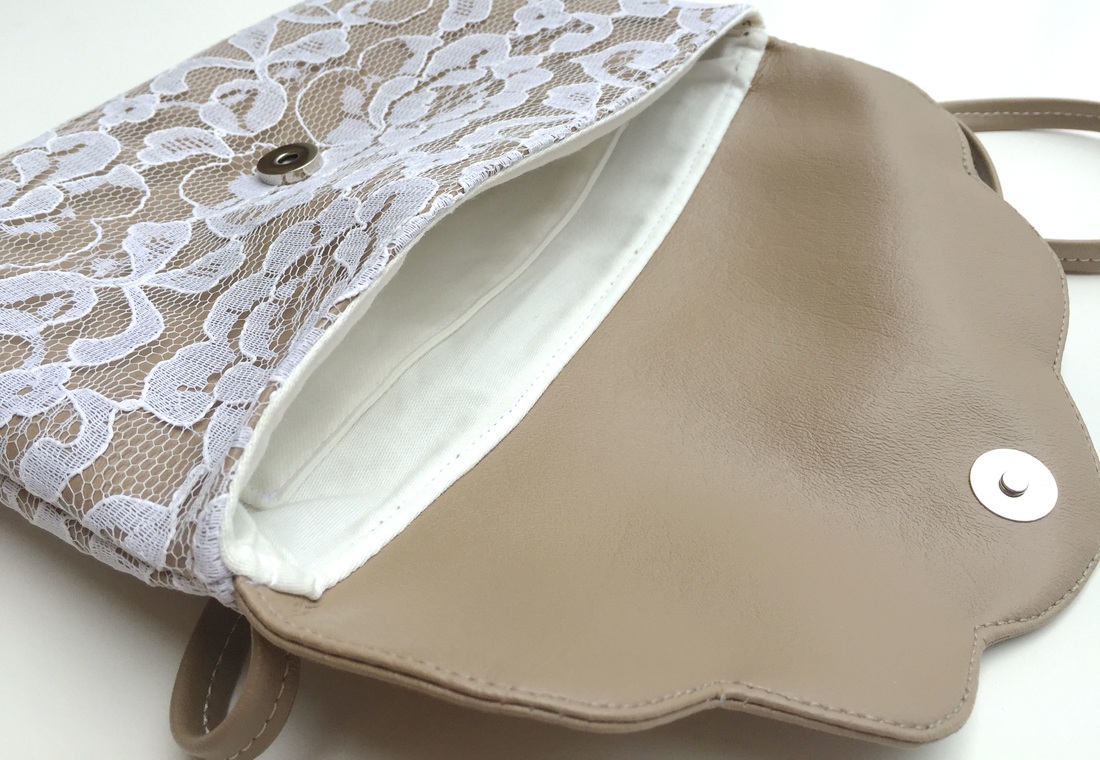
Ann, Lynda, and Steve were so much fun to work with, and I loved seeing their ideas for their Indiana pillows. Re-purposing old pillow stuffing, celebrating Butler, or creating a party decoration, everyone brought their own story to the sewing machine and I found it fascinating and inspiring to see how everyone managed to individualize their creations. Despite a few machine setbacks, everyone managed to end up with a beautiful pillow in the end! 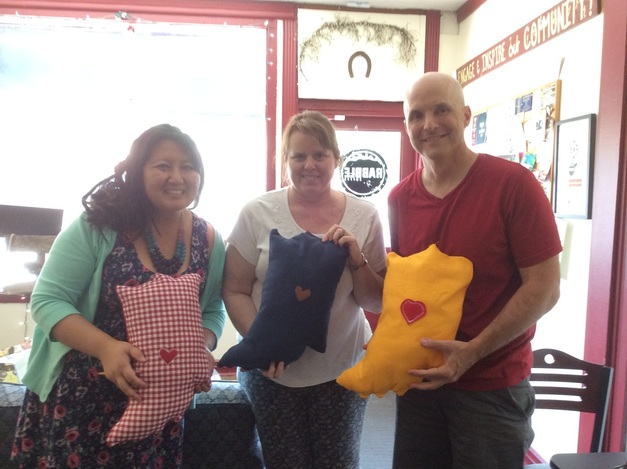 The biggest challenge (after hauling a carload of sewing tools into the coffee shop: Thank you Steve for your help!) was actually how much time we needed. Because this was my first time teaching this class, I misjudged how much time we would need. Timing myself making a pillow apparently really doesn’t work well as a benchmark since I regularly sew 40 hours a week and I know the pattern backwards and forwards. The class was supposed to be from 3:30 to 5:00, and even with starting a bit early, I didn’t end up leaving until 6:00! 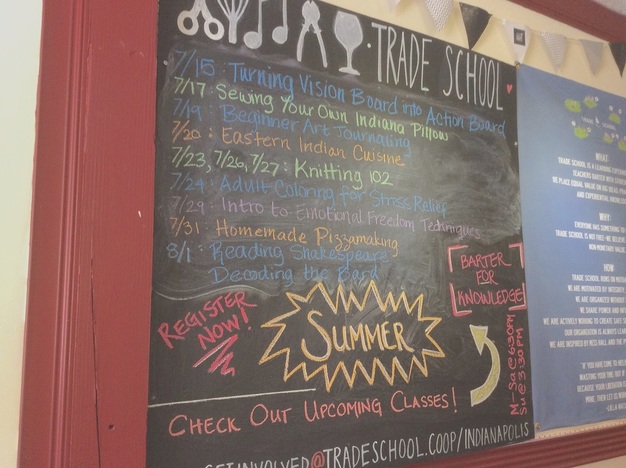 Luckily, Josie, the owner of Rabble Coffee was super nice and willing to stay late to let us keep working. I had never been to Rabble Coffee before this class. The trade school used to be located in the circle city industrial complex, which is where I taught my last class. But I definitely prefer Rabble! Not only do they make a delicious smoothie, but I find it an inspiring place! Josie, who seems to be about my age (although I am a notably terrible judge of these things), has apparently wanted to open a coffee shop since she was a kid, and has had Rabble up and running for almost a year now. A cool girl living out her dream while making a difference in a comeback neighborhood. I don’t know about you but I think this is super inspiring. Maybe it’s the struggling business owner in me. Basically, count me in for going back to Rabble, and count me in for teaching another Trade School class. It was more fun, and even more inspiring than I had hoped for. 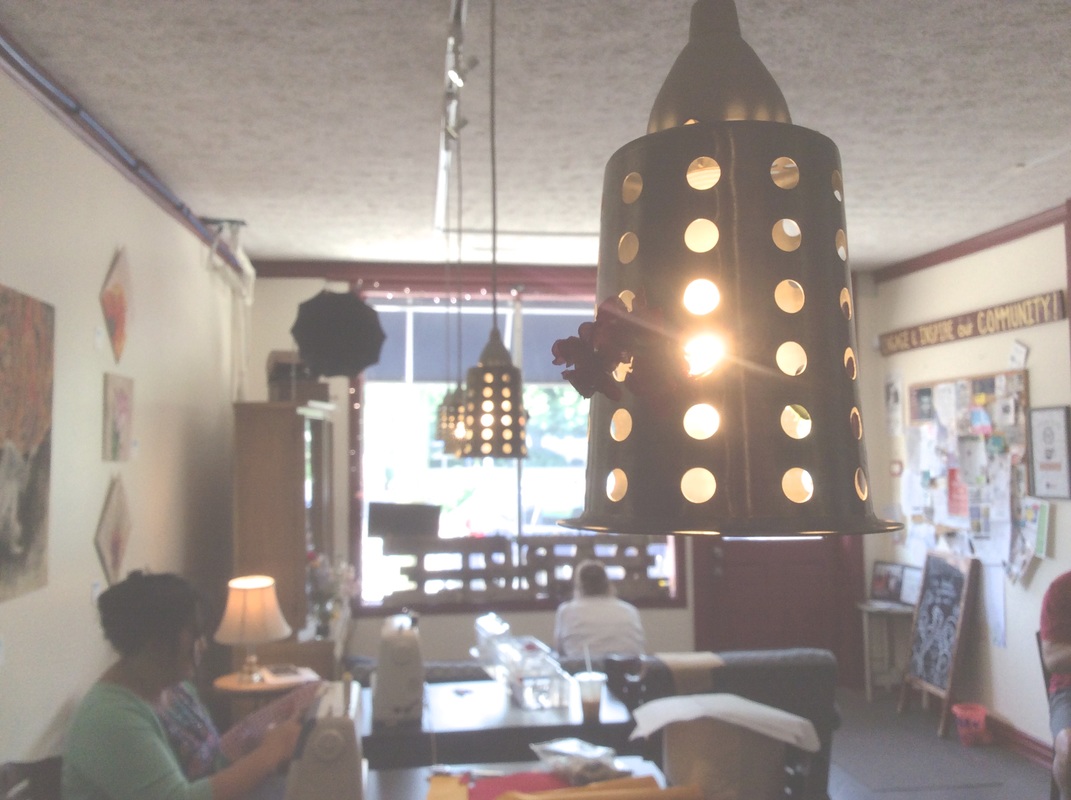 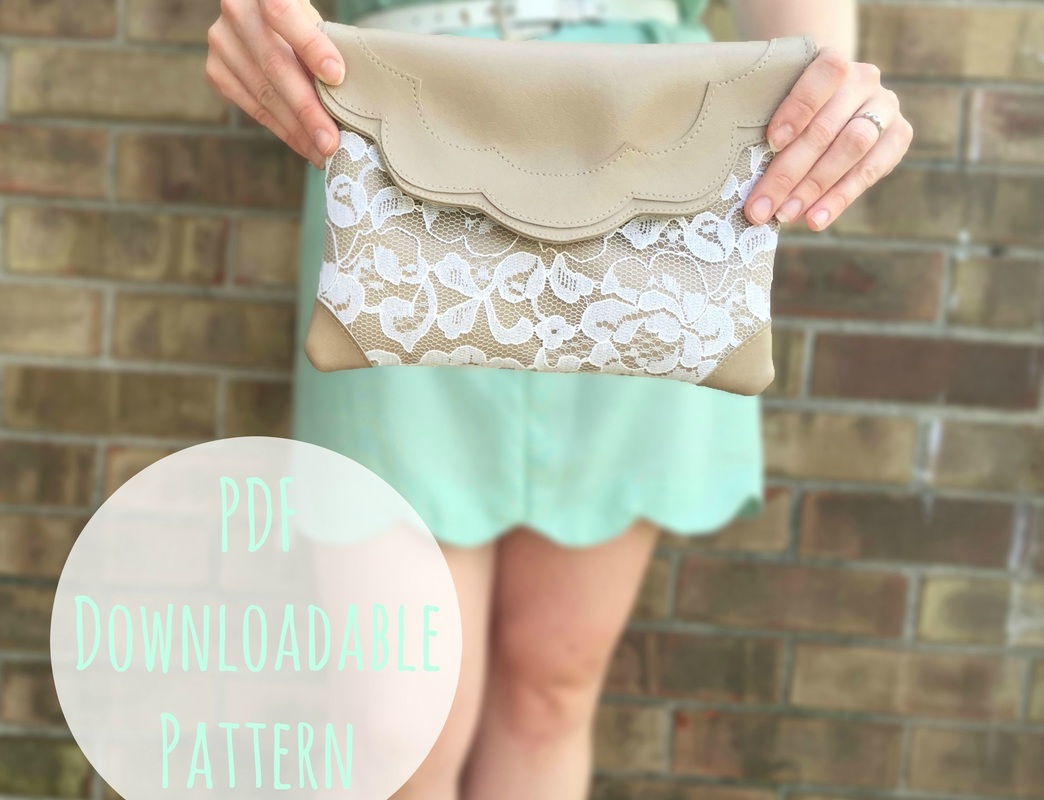 I have just released my newest pattern! It is a Lace Scalloped Bag and comes with a PDF Downloadable Pattern and Photo Tutorial And to celebrate the new release, it is 15% off til the end of April! You can find it in my Pattern Shop or in my Etsy Shop (use coupon code PATTERN15) This pattern is great for Confident Beginners. It is a simple enough pattern, but your choice of fabrics can make it more difficult (and interesting!) These bags can be made as a clutch or a cross body, and make great gifts, especially for bridesmaids!  Your Finished Bag Size will be: 10” wide by 7” tall (25cm x 18cm) with 55" cross body or 11.5" wrist strap options (140 cm or 29 cm)  The pattern can be immediately downloaded and printed at home! Your download includes: • PDF printable pattern that is compatible with US letter or A4 paper • Detailed PDF instructions that include what tools and yardage (or meters) of material you need, and the directions for how to use the pattern and sew your very own bag with tons of step by step photos! • Tips on what fabrics to use and ideas for creative ways to make your bag reflect your own unique style.
To see more sewing patterns take a look at my shop or If you decide that sewing sucks, and you would rather just buy one, visit my Etsy shop! If you would like to receive updates (and discounts) when a new pattern comes out, sign up for my email list. 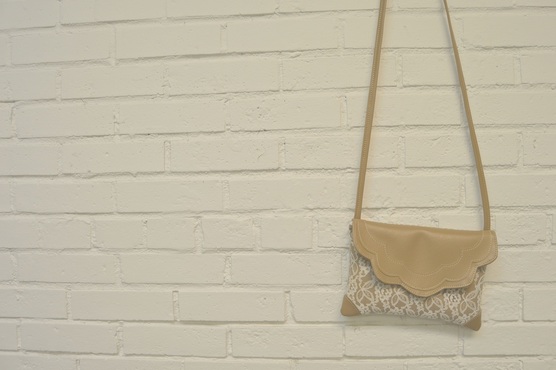 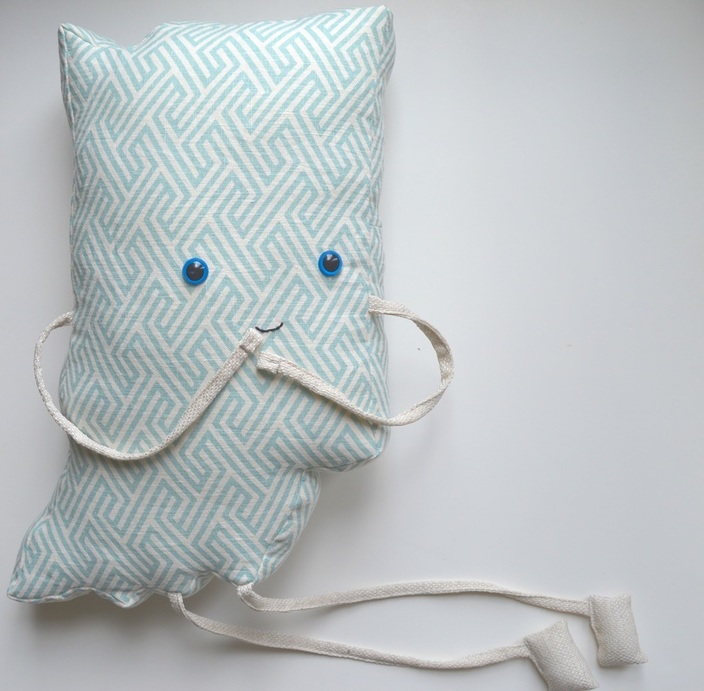 The Backstitch is a very simple but useful stitch to know. It is perfect for hand embroidery when you need to sew a continuous line of stitching, like on this Indiana pillow. Below, I have a simple photo explanation for how to sew a backstitch. 1. bring the needle up through the underside 2. take a stitch BACKWARDS (hence the "back" stitch) 3. bring the needle to the top again leaving a space to be filled with your next stitch backwards 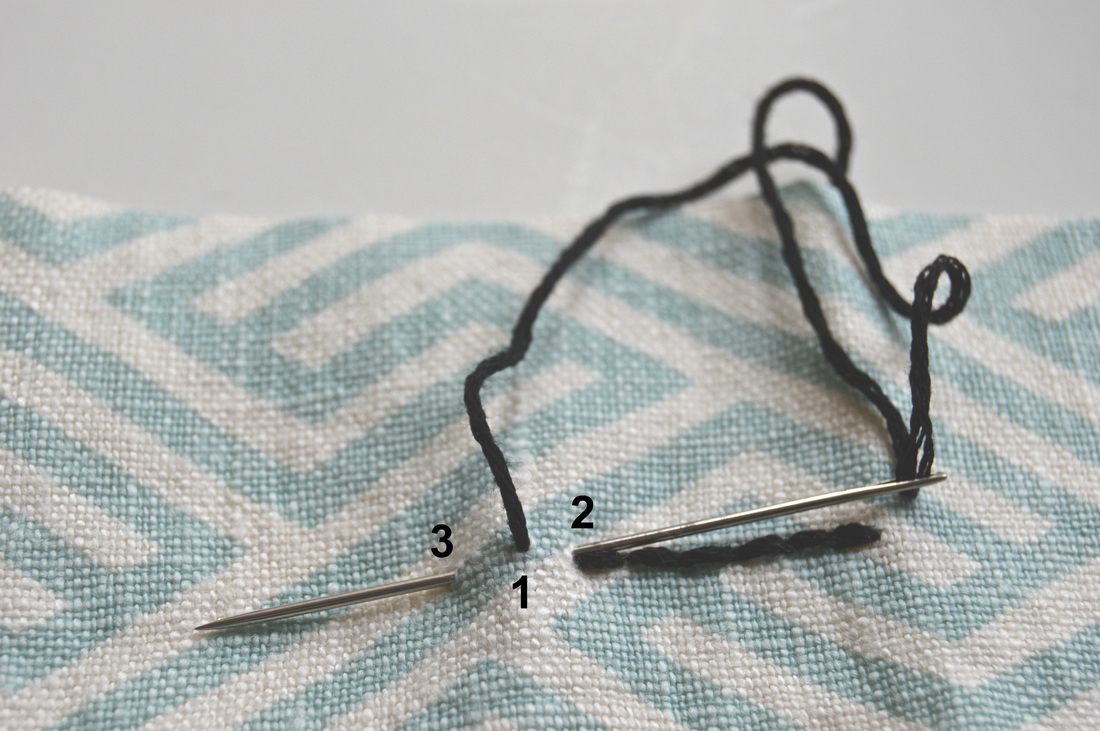 I also have a short video to demonstrate this stitch in action. It's not a polished video at all, but it does the trick!  I have a new downloadable pattern for you! It is super simple, and super cute! You can find the Top Knot Headband in my shop store. Here's a little visual help using the pattern: 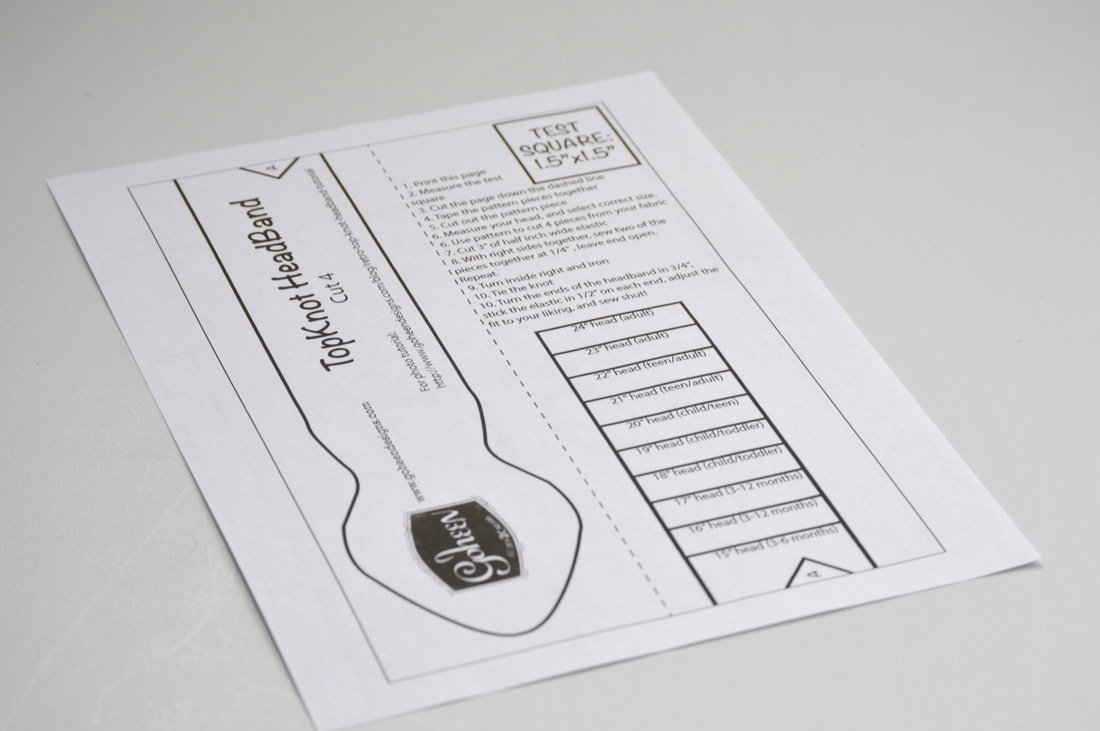 When you print your pattern, make sure that you click the option that says "Actual Size", so that it will print correctly: 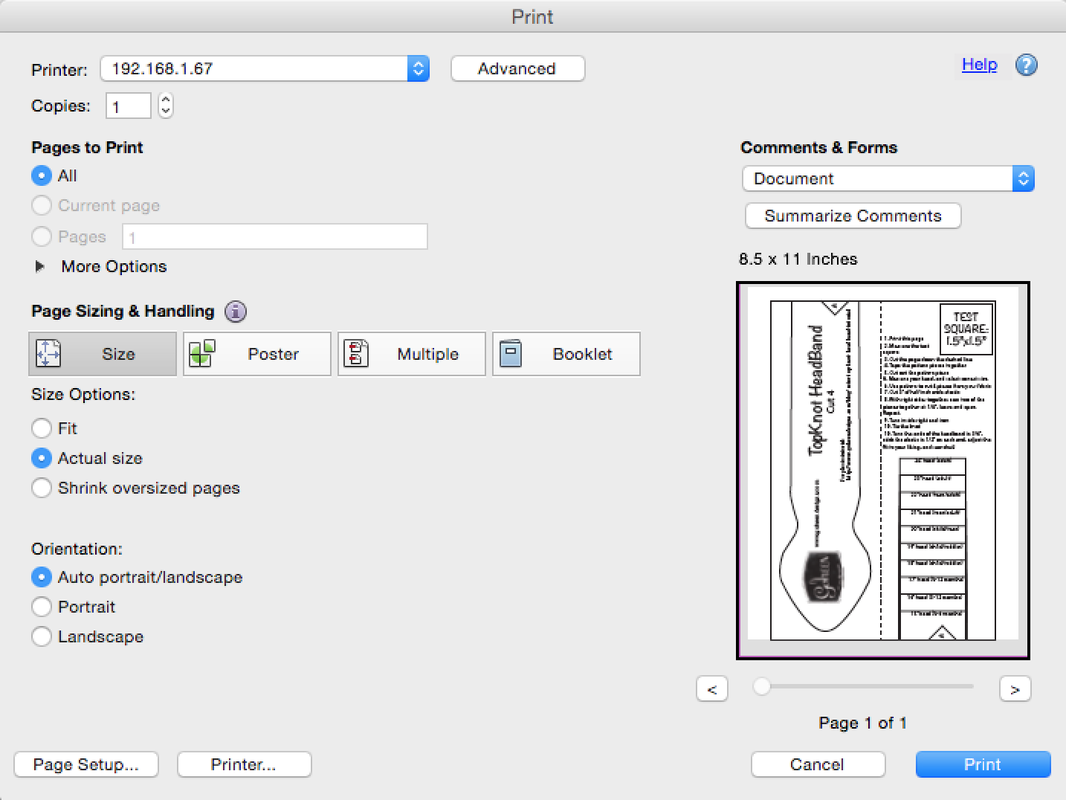 Use a ruler to make sure that the Test Square does indeed measure 2"x2" 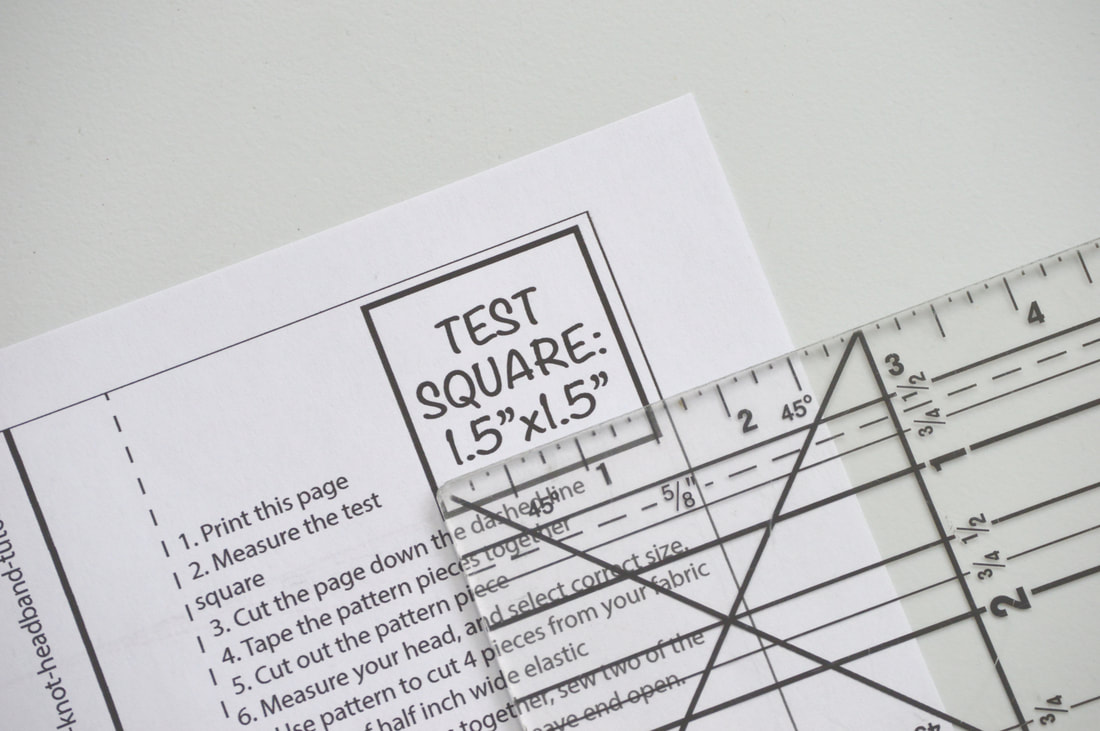 Cut the page down the dashed line:  Cut off one of the "A" edges, and place it on top of the other "A", matching them and taping them in place. Then cut out the pattern piece, and you're ready to use it. 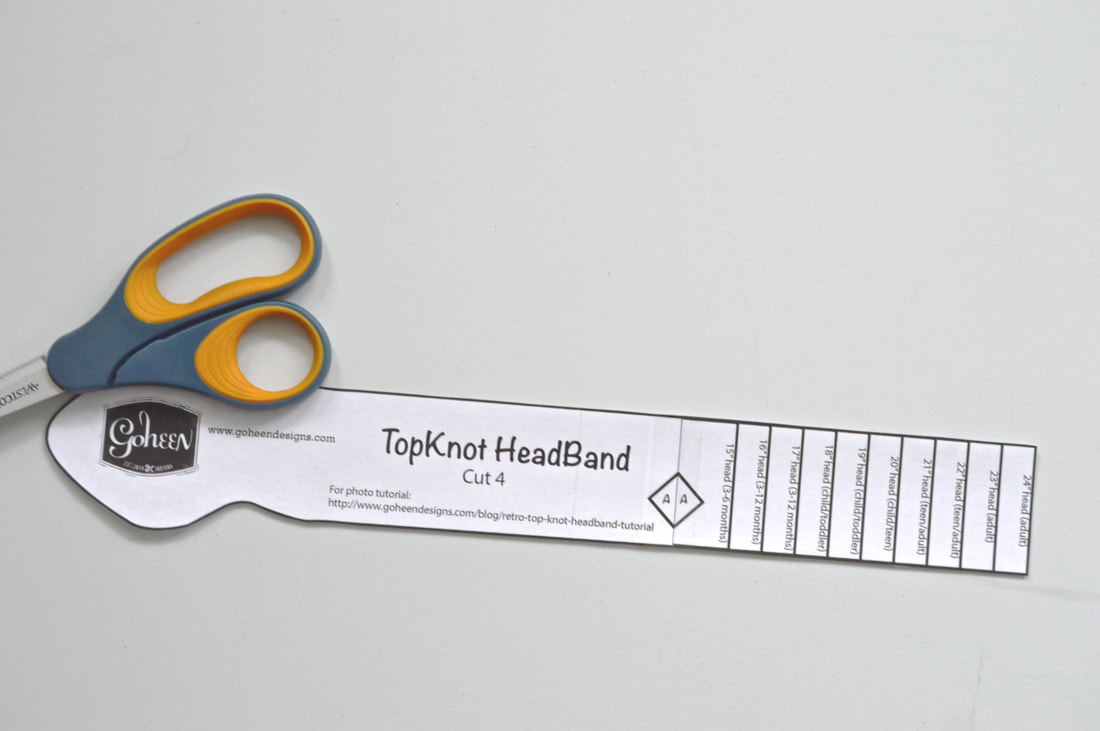 You'll see that the pattern has several different sizes for you to choose from. These sizes are based on the actual head circumference measurement. So measure your own head (or whoever is going to be wearing the headband) and pick which size would work best for you! Use the pattern to cut out 4 fabric pieces: 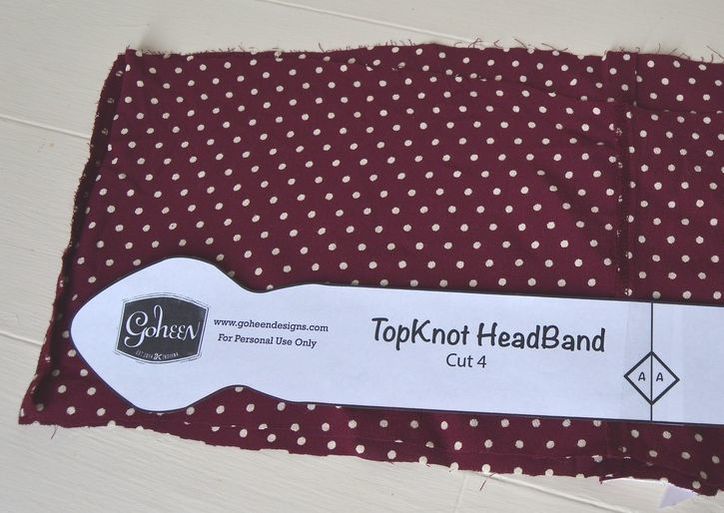 Pin your pattern pieces right sides together and sew with 1/4" seam allowance, leaving the small end open (the left ends in the picture below):  Clip the curves, turn the pieces inside right, and iron them: 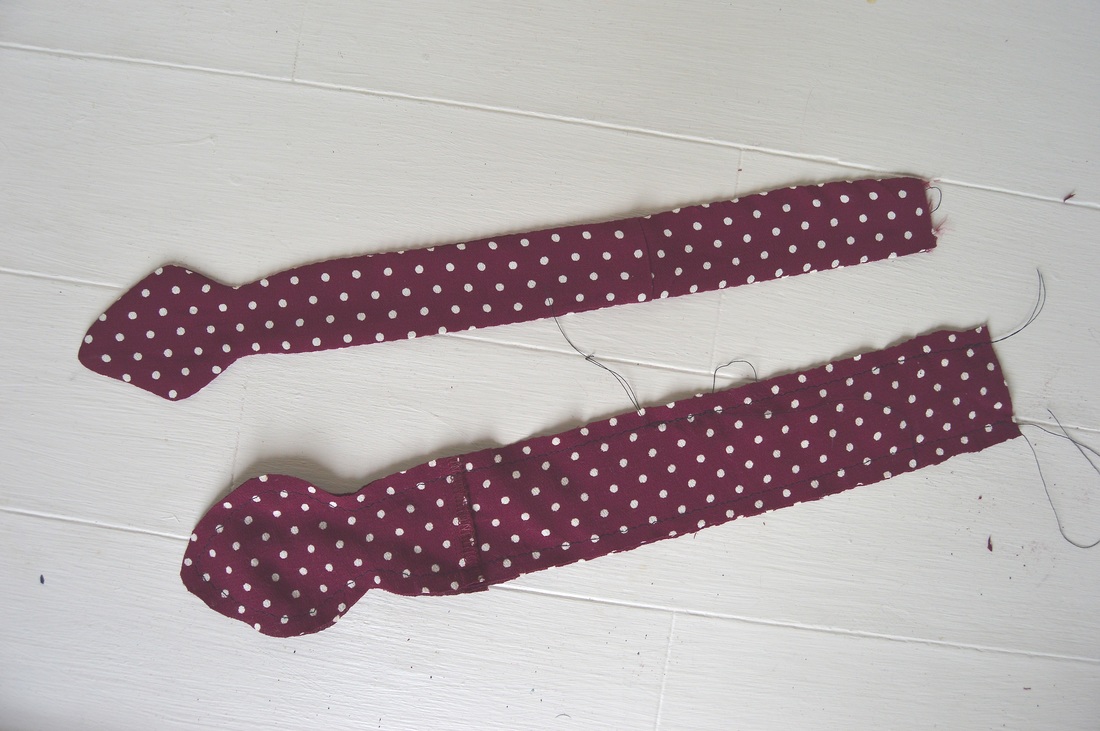 Tie the "Top Knot" in your headband. 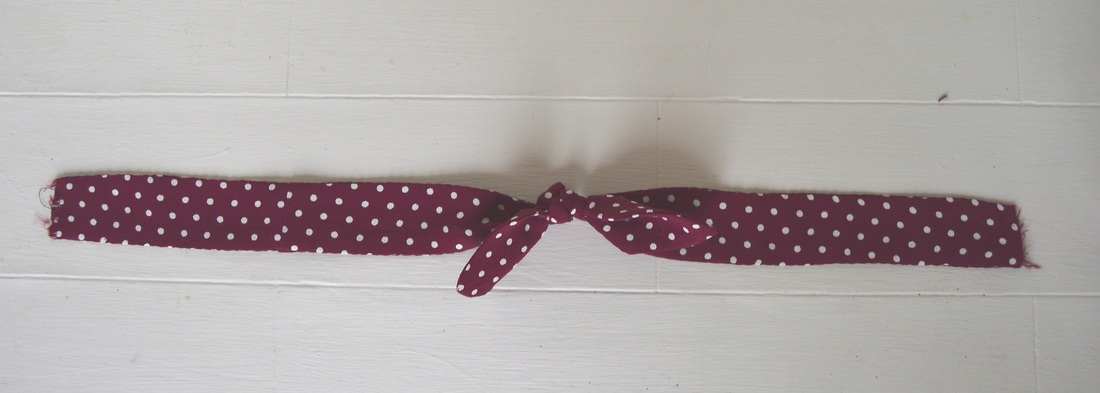 Turn in the ends of your headband 3/4". Then cut 3" of elastic for the back of your headband. Place 1/2" of each end of the elastic inside your headband ends and pin them in place. This is, theoretically, the finished size of your headband. But, as we all will tie the knot a little differently, and may prefer different levels of snugness, it is very important for you to test this size and make sure you like the fit! You can add or subtract from the headband or elastic to perfect it! 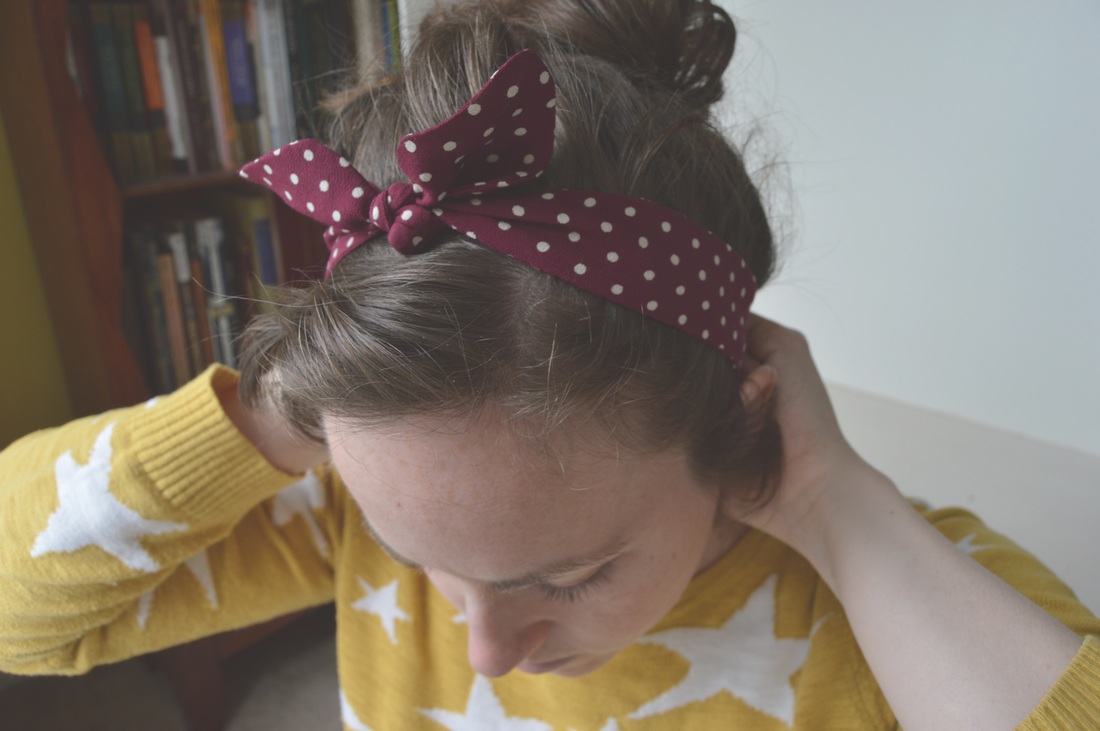 Topstitch the elastic into the ends of your headband. For my headband (pictured below) I shortened the elastic to 2.5", still inserting .5" on either side. I like my headbands tight! 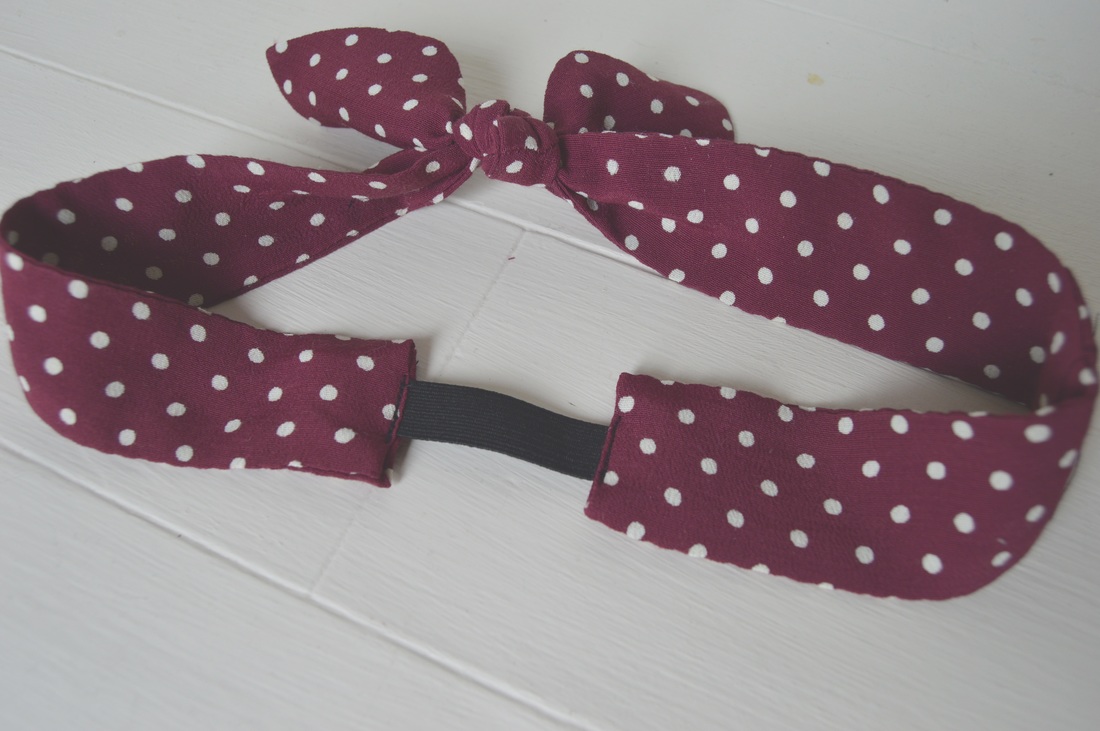 Closeup of the topstitching: 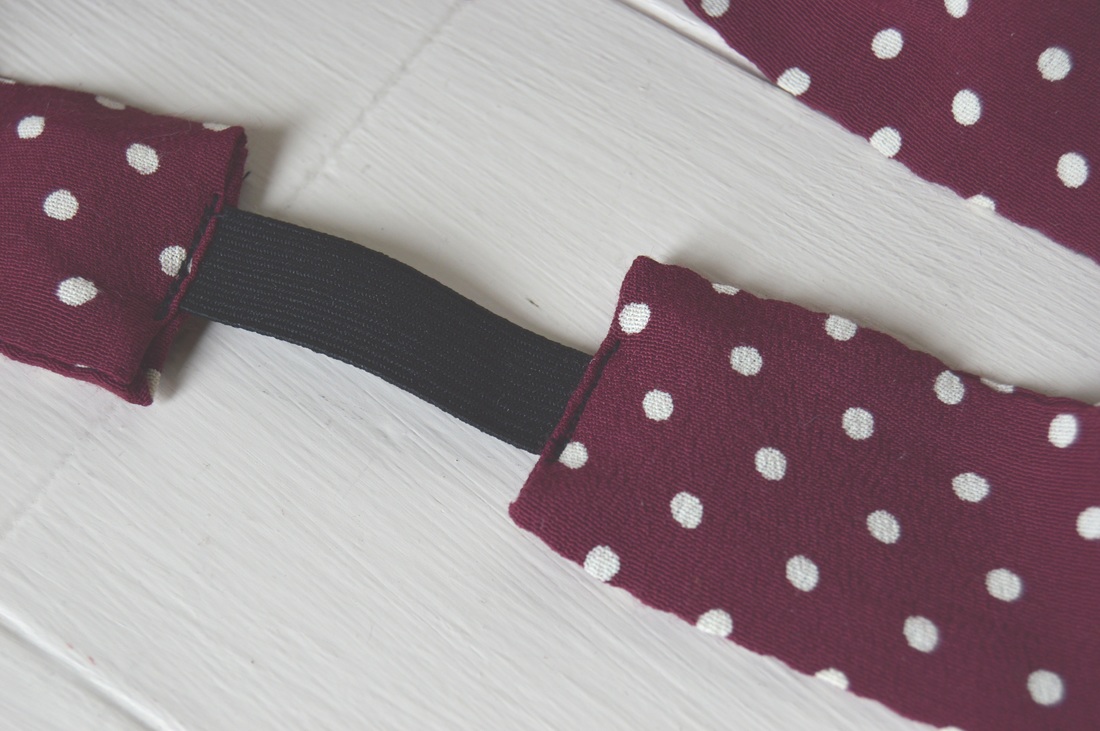 After the initial topstitching, fold the corners in on the underside and stitch across it again. 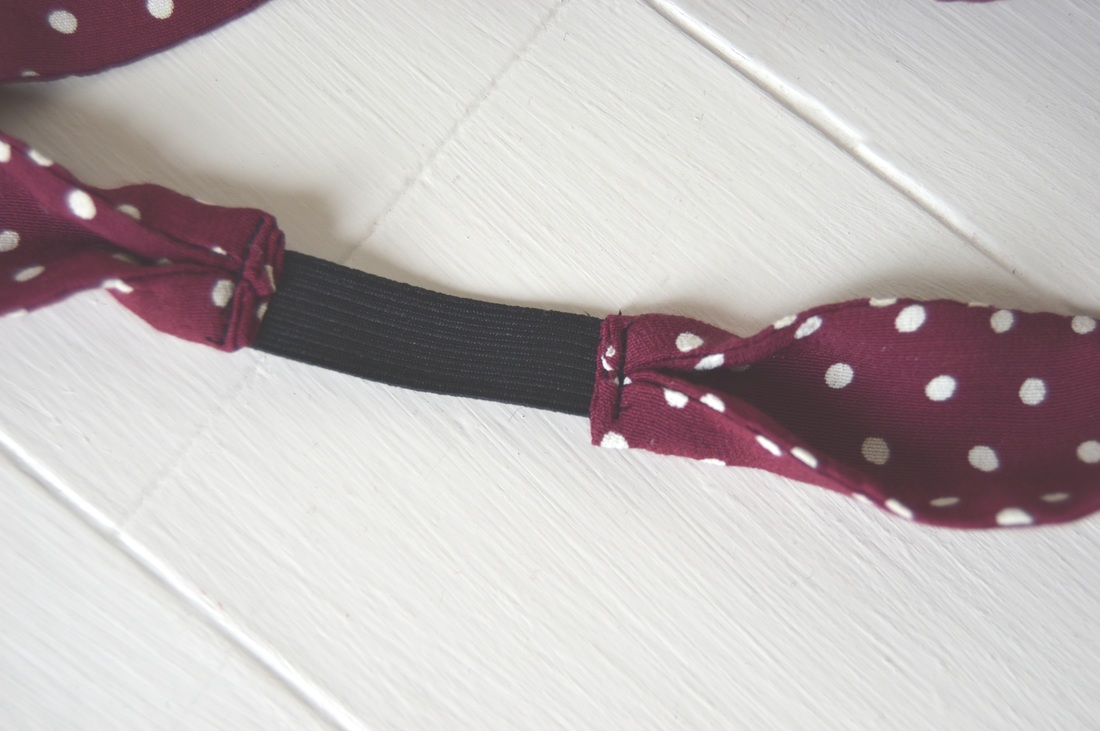 Now your headband is done! Enjoy! 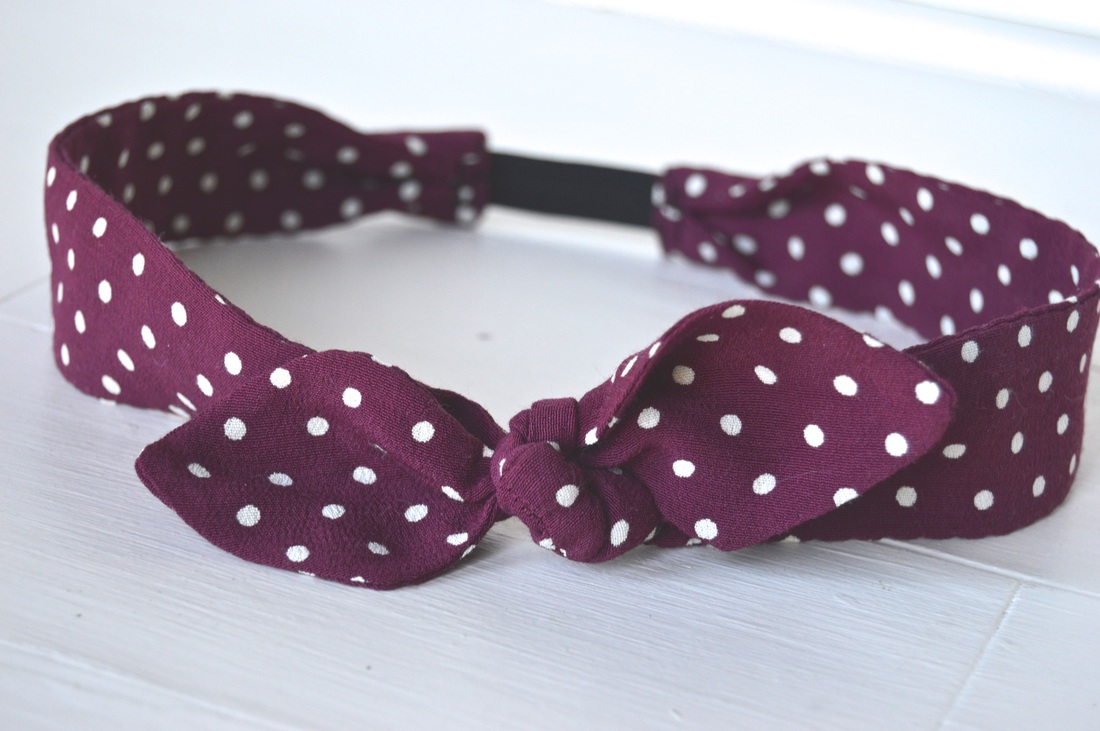 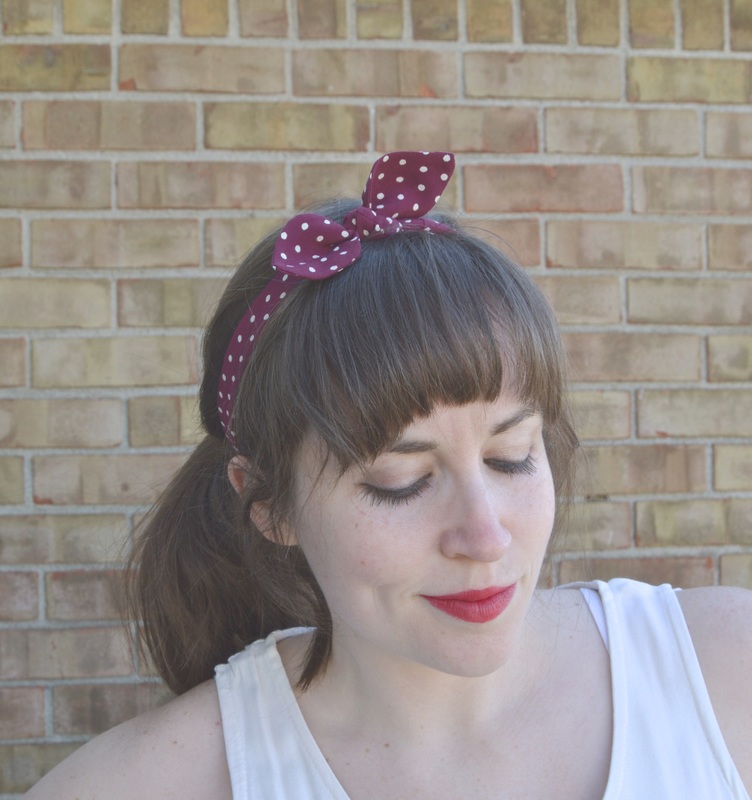 |
madeline stage
creative business owner. designer. hoosier. crafter. runner. sewer. swing dancer. outdoor enthusiast. entrepreneur. wife. mom. material hoarder. Categories
All
Archives
June 2023
My Instagram Feed:
@GoheenDesigns |
 RSS Feed